
How to Auto-Export Highlights with Zapier


We’re excited to announce a new tutorial on Glasp: How to Auto-Export Highlights with Zapier
With this workflow, you can automatically export your Glasp highlights — including web articles, PDFs, and YouTube transcripts — to any app you use, without copying and pasting manually.
Whether it’s team updates, personal knowledge bases, or content workflows, Glasp + Zapier lets you:
Automatically fetch new highlights from your Glasp account on a schedule
Send highlights to Slack channels for team visibility
Export to Google Sheets for tracking and analysis
Post to Discord for community sharing
Receive highlights by email via Gmail
In this tutorial, we’ll walk you through how to set up the Zap, configure your Glasp API credentials, and connect your favorite destinations — so your highlights flow automatically into the tools you already use.
🪄 How It Works
Let’s walk through how to set it up in just a few steps 👇
Step 1: Sign Up for Glasp
Choose your preferred browser, such as Google Chrome, Brave, Safari, or Microsoft Edge.
In your browser’s address bar, type glasp.co and you’ll be taken directly to Glasp’s website. You can also access it from the link below.
👉 Glasp — Social Web Highlighter
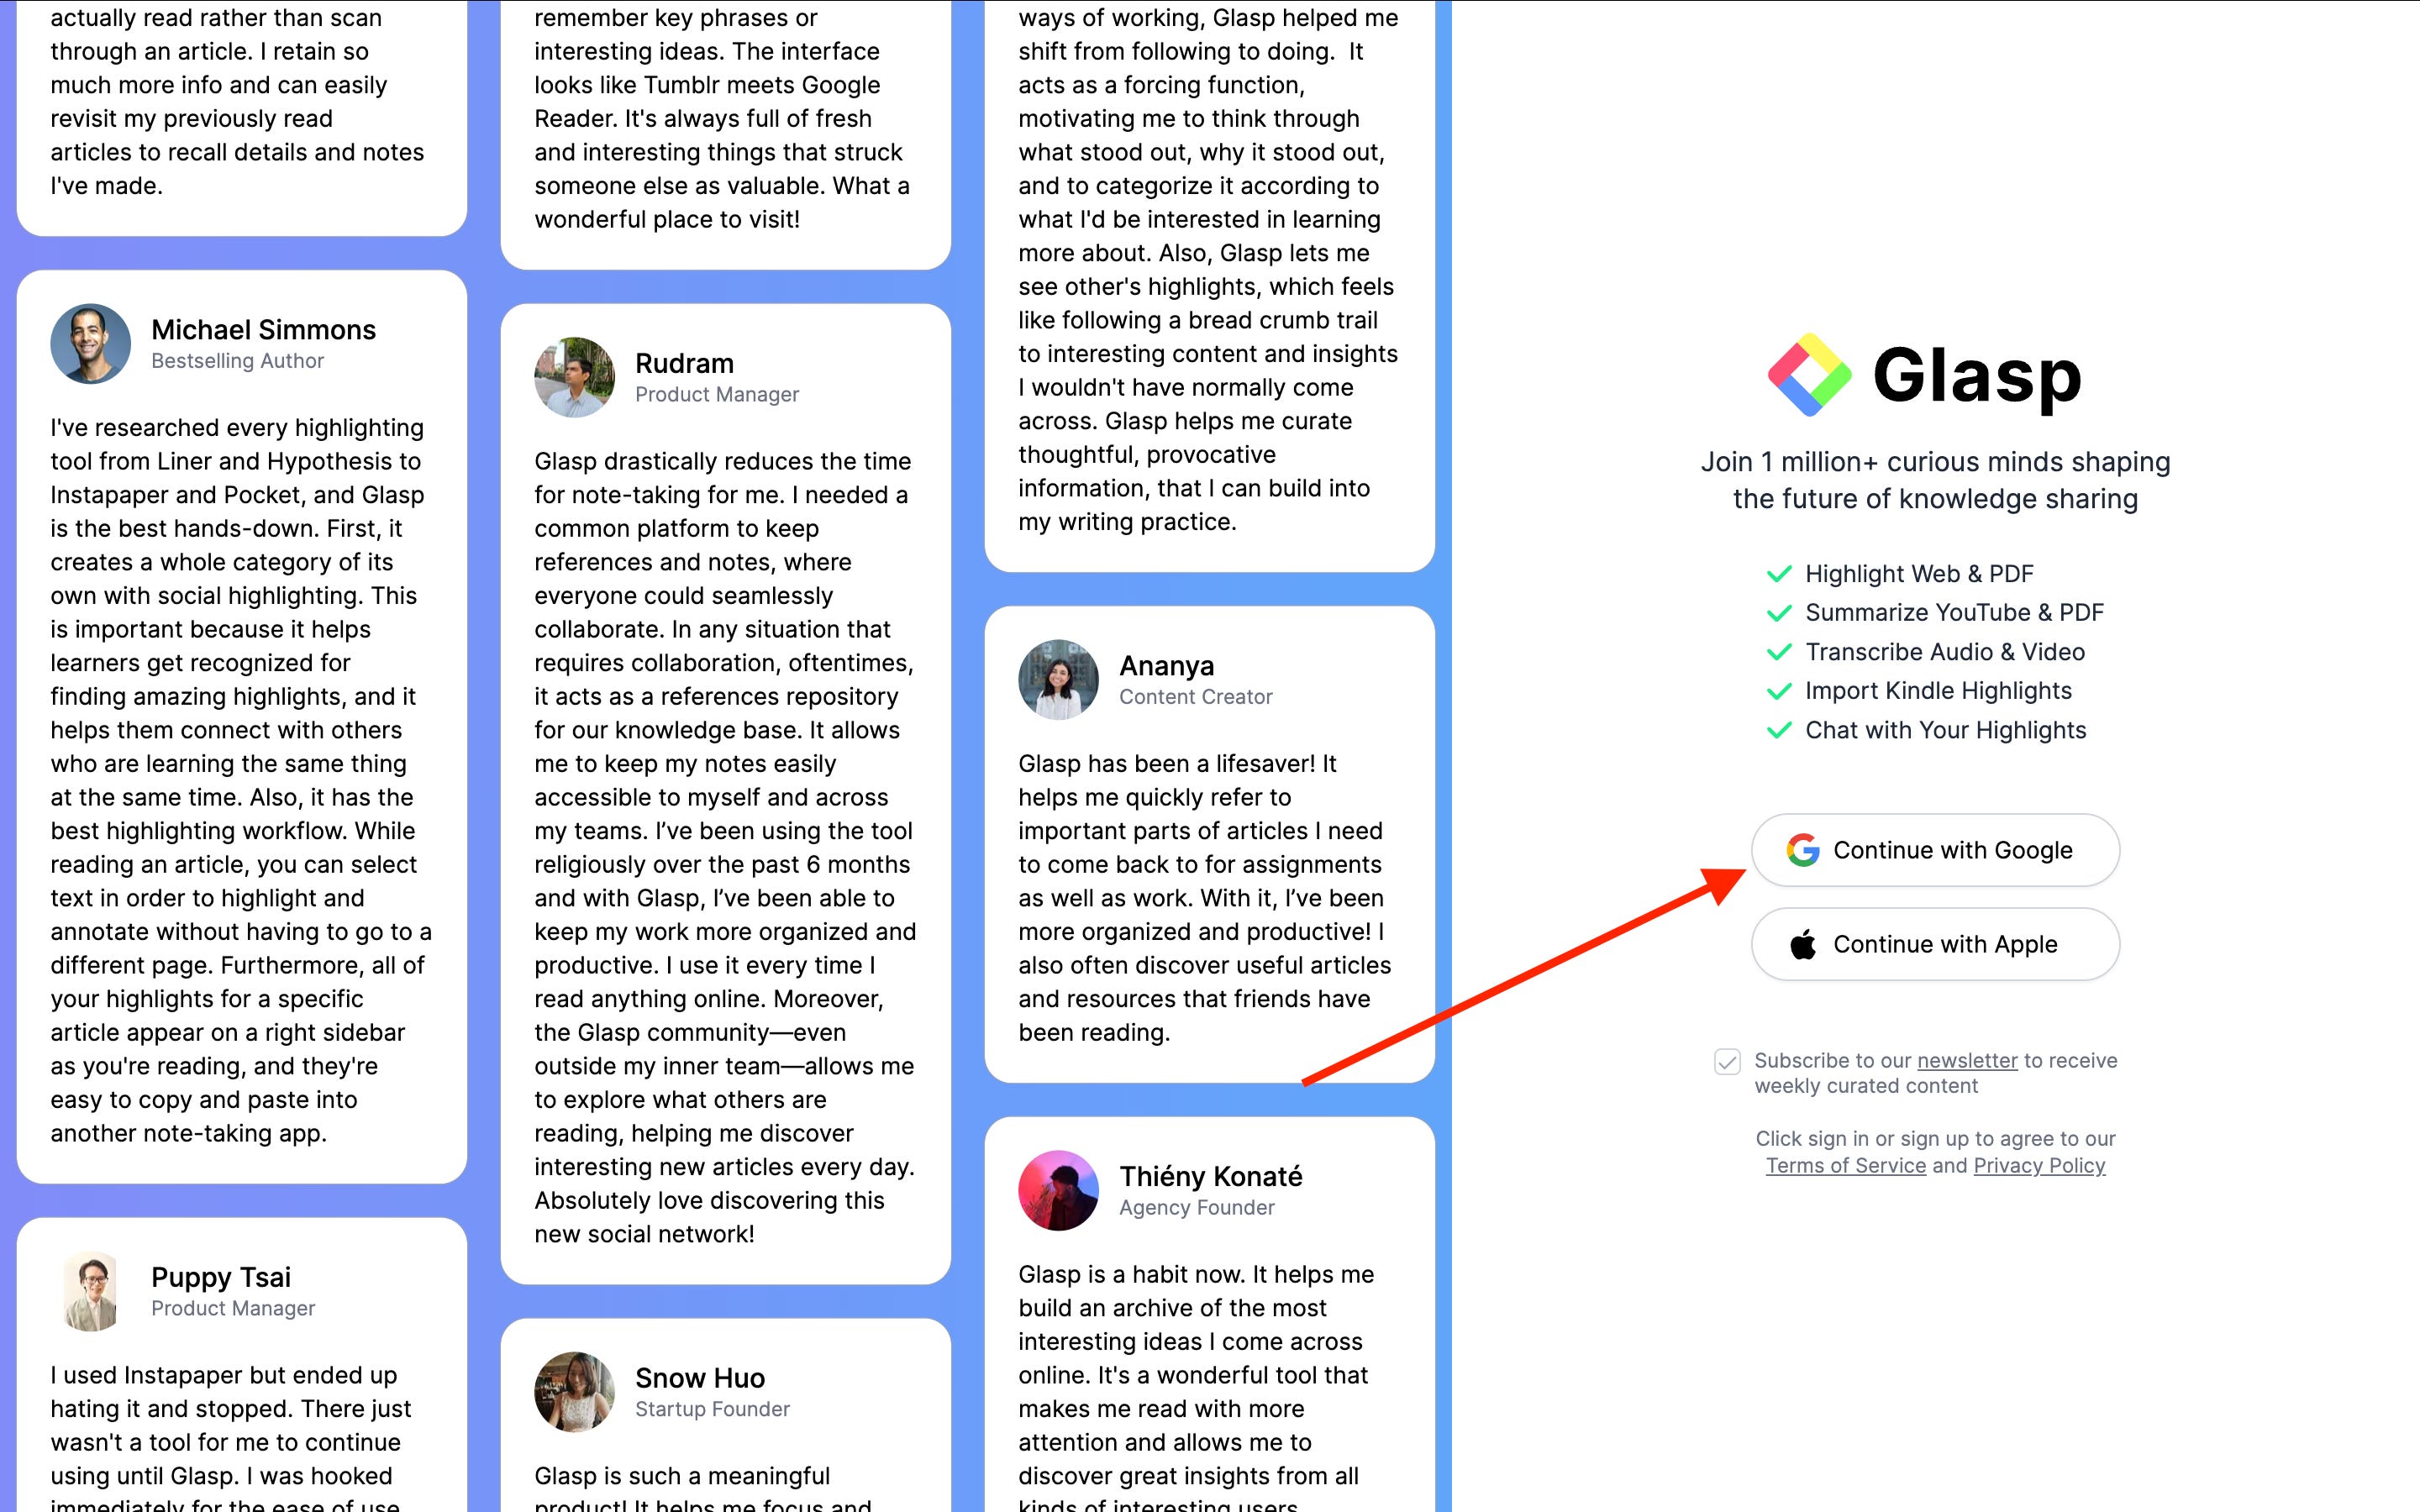
Once you’re on the site, click Sign up and continue with your Google account.

You can sign up for Glasp with either Google Sign-in or Apple Sign-in. If you’re not an iPhone/iPad user, we strongly recommend you use Google Sign-in.
After finalizing your account, you will be taken to welcome page.
Step 2: Go to Zapier
First, open the Glasp integration page on Zapier. If you don’t have a Zapier account yet, you can create one for free — the free plan supports up to 100 tasks per month, which is enough for most personal workflows.
You’ll see a set of pre-built templates for connecting Glasp with popular apps like Slack, Discord, and Google Sheets.
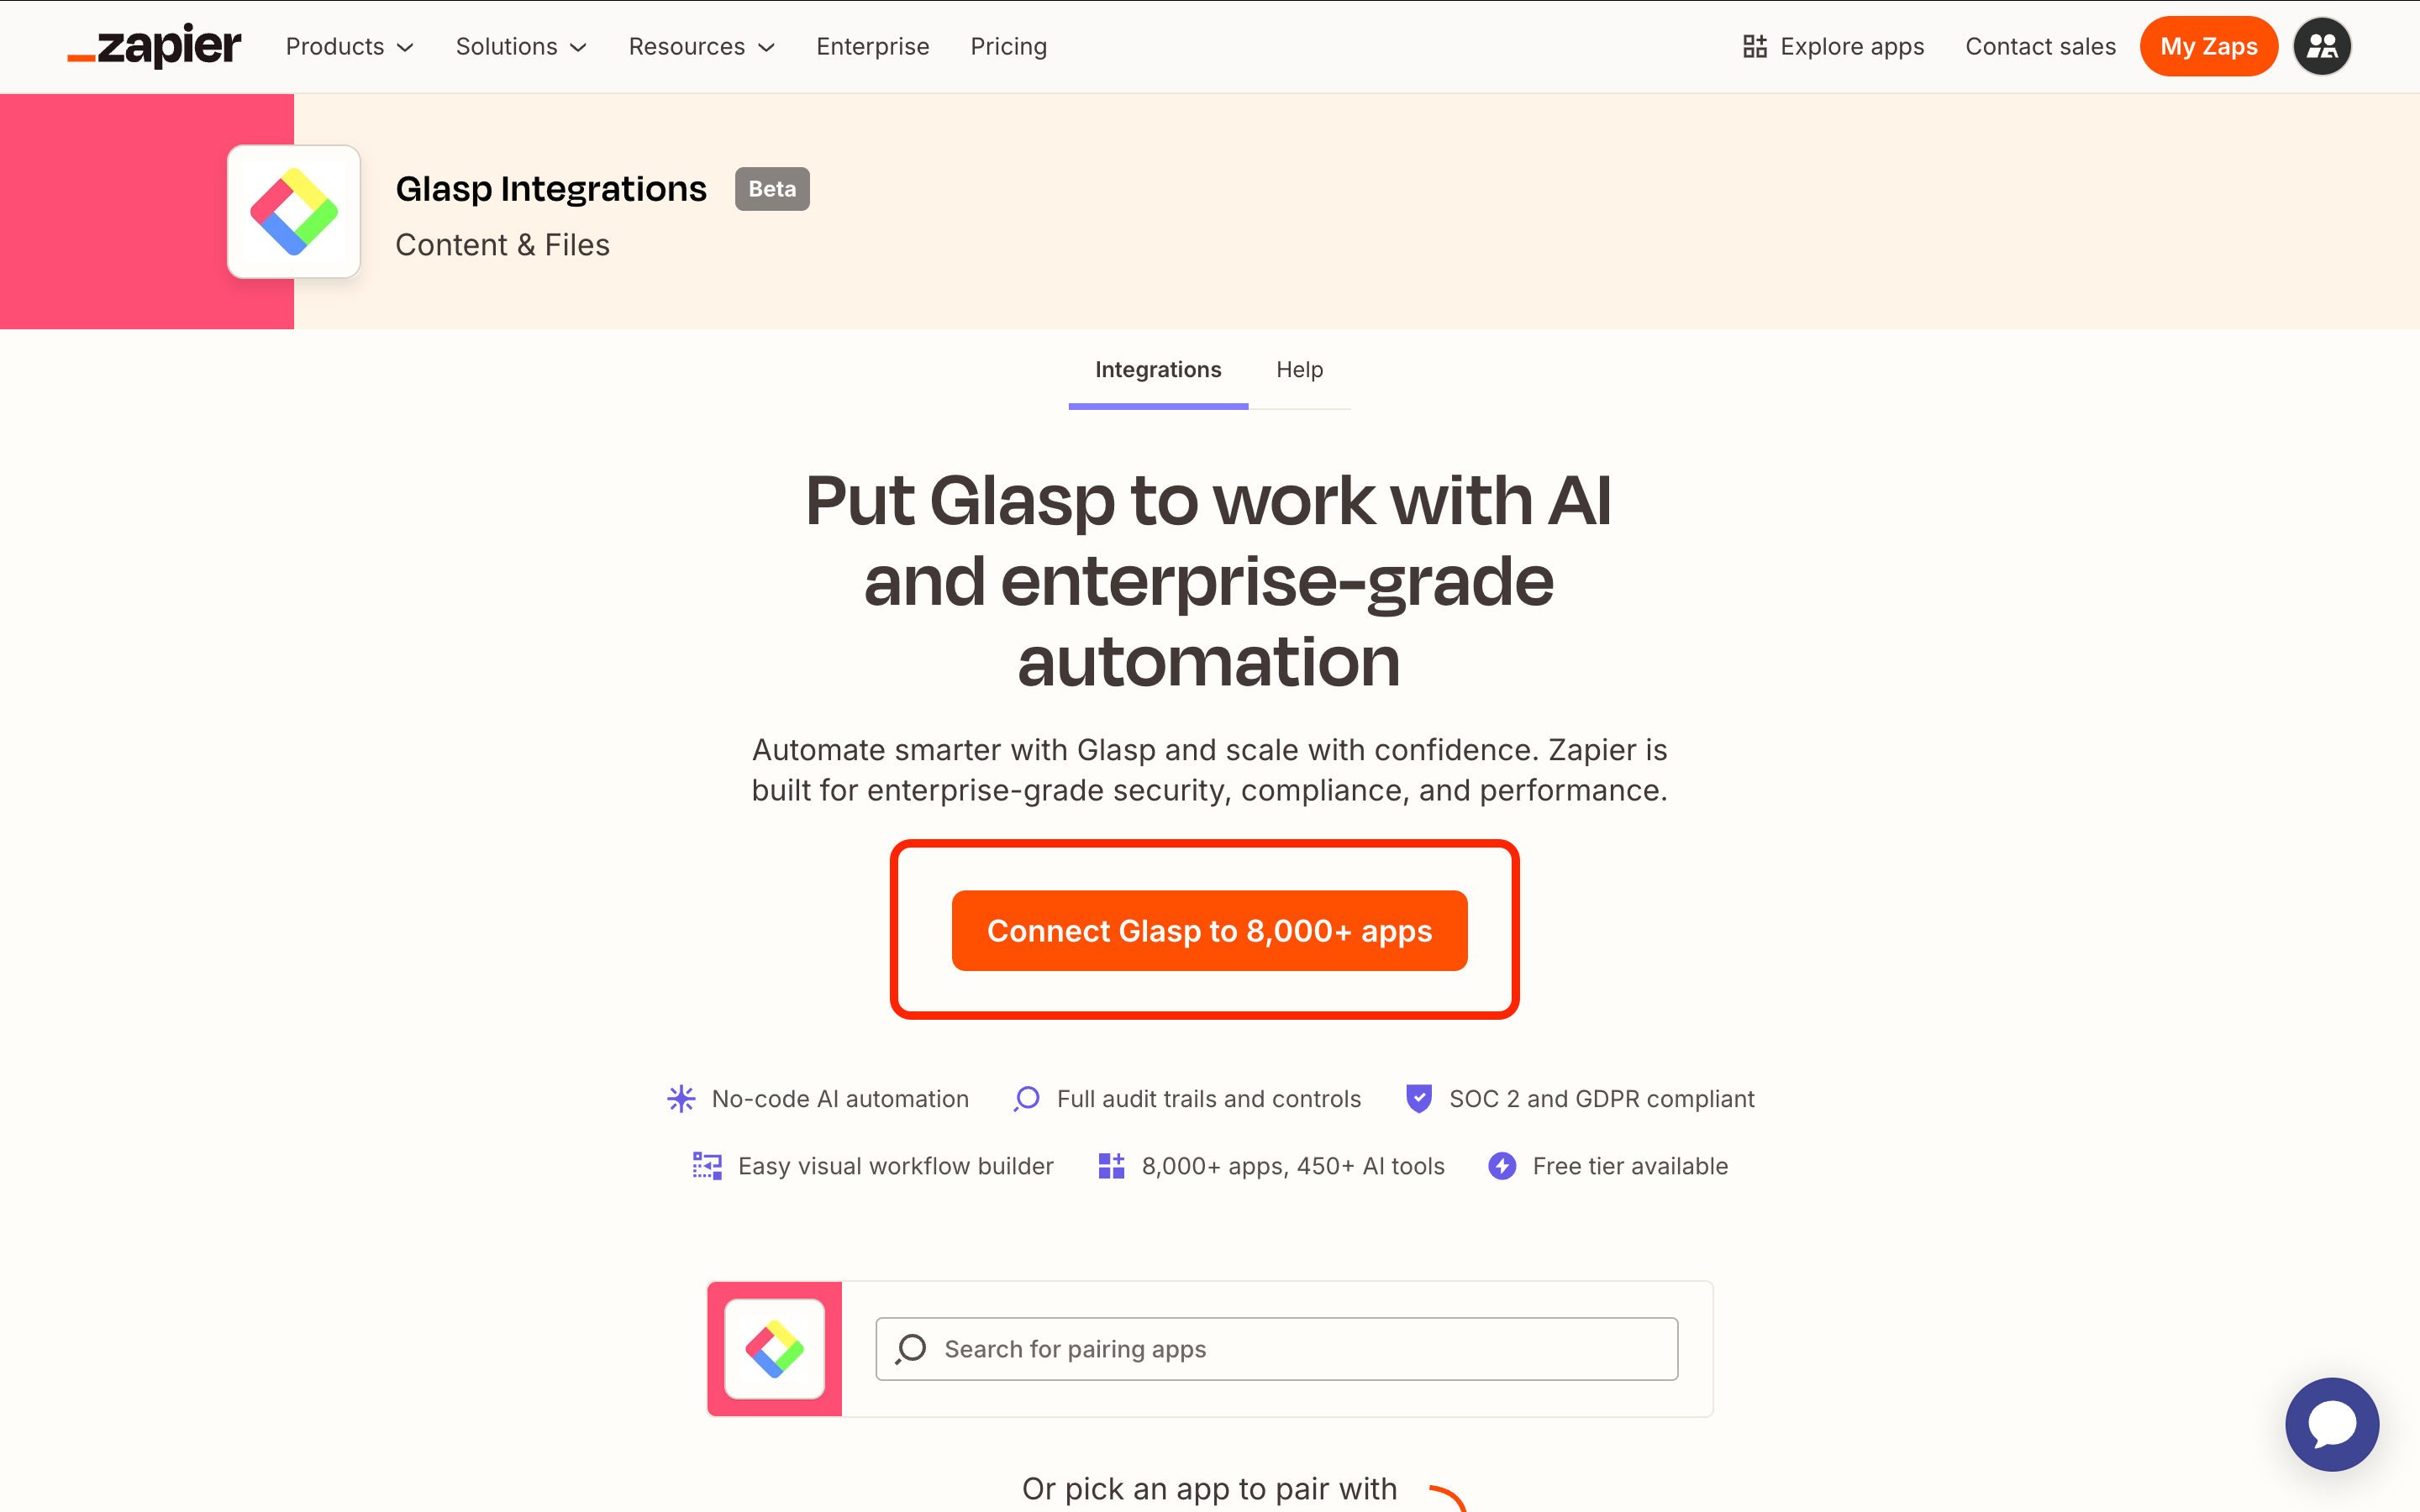
Click “Connect Glasp to 8,000 apps” to open the Zap editor.
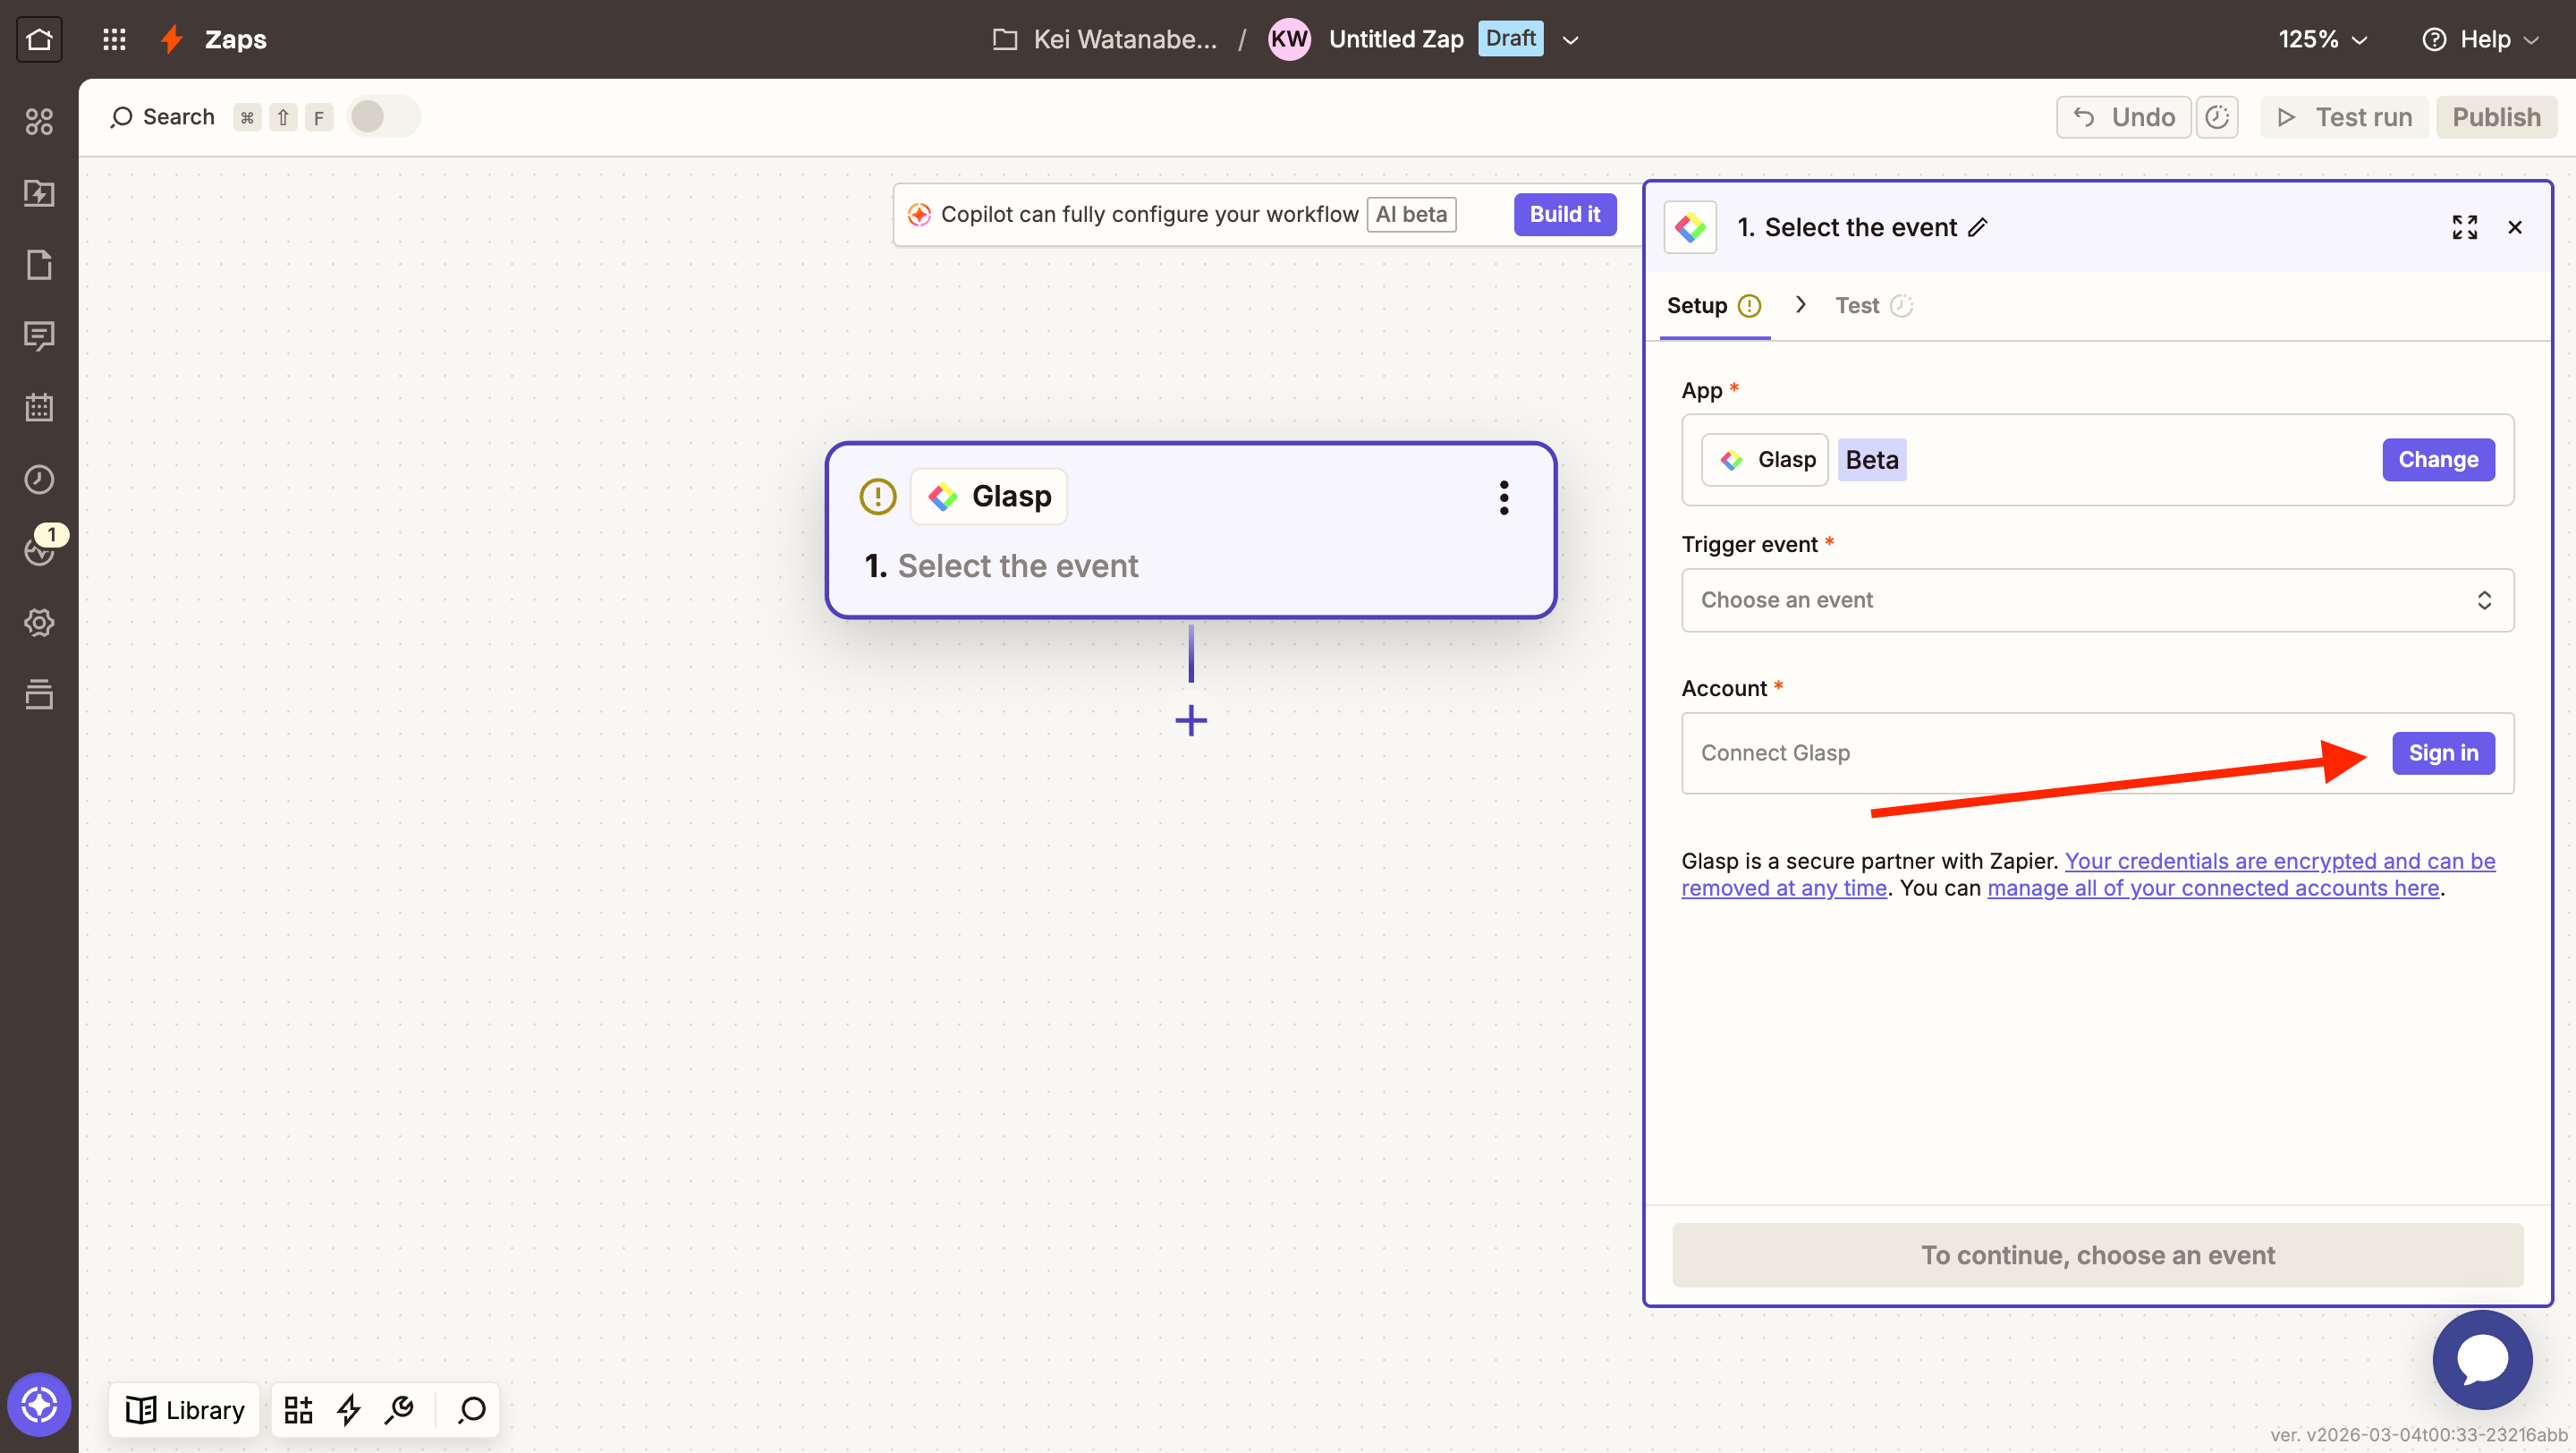
Once the editor opens, you’ll see the Zap with a single step: a Glasp trigger.
Step 3: Get Your Glasp Access Token
To connect Zapier with Glasp, you’ll need your personal API access token.
Once you’ve signed up for Glasp, go to Glasp Access Token page. Click Generate if you haven’t created one yet, or copy your existing token.
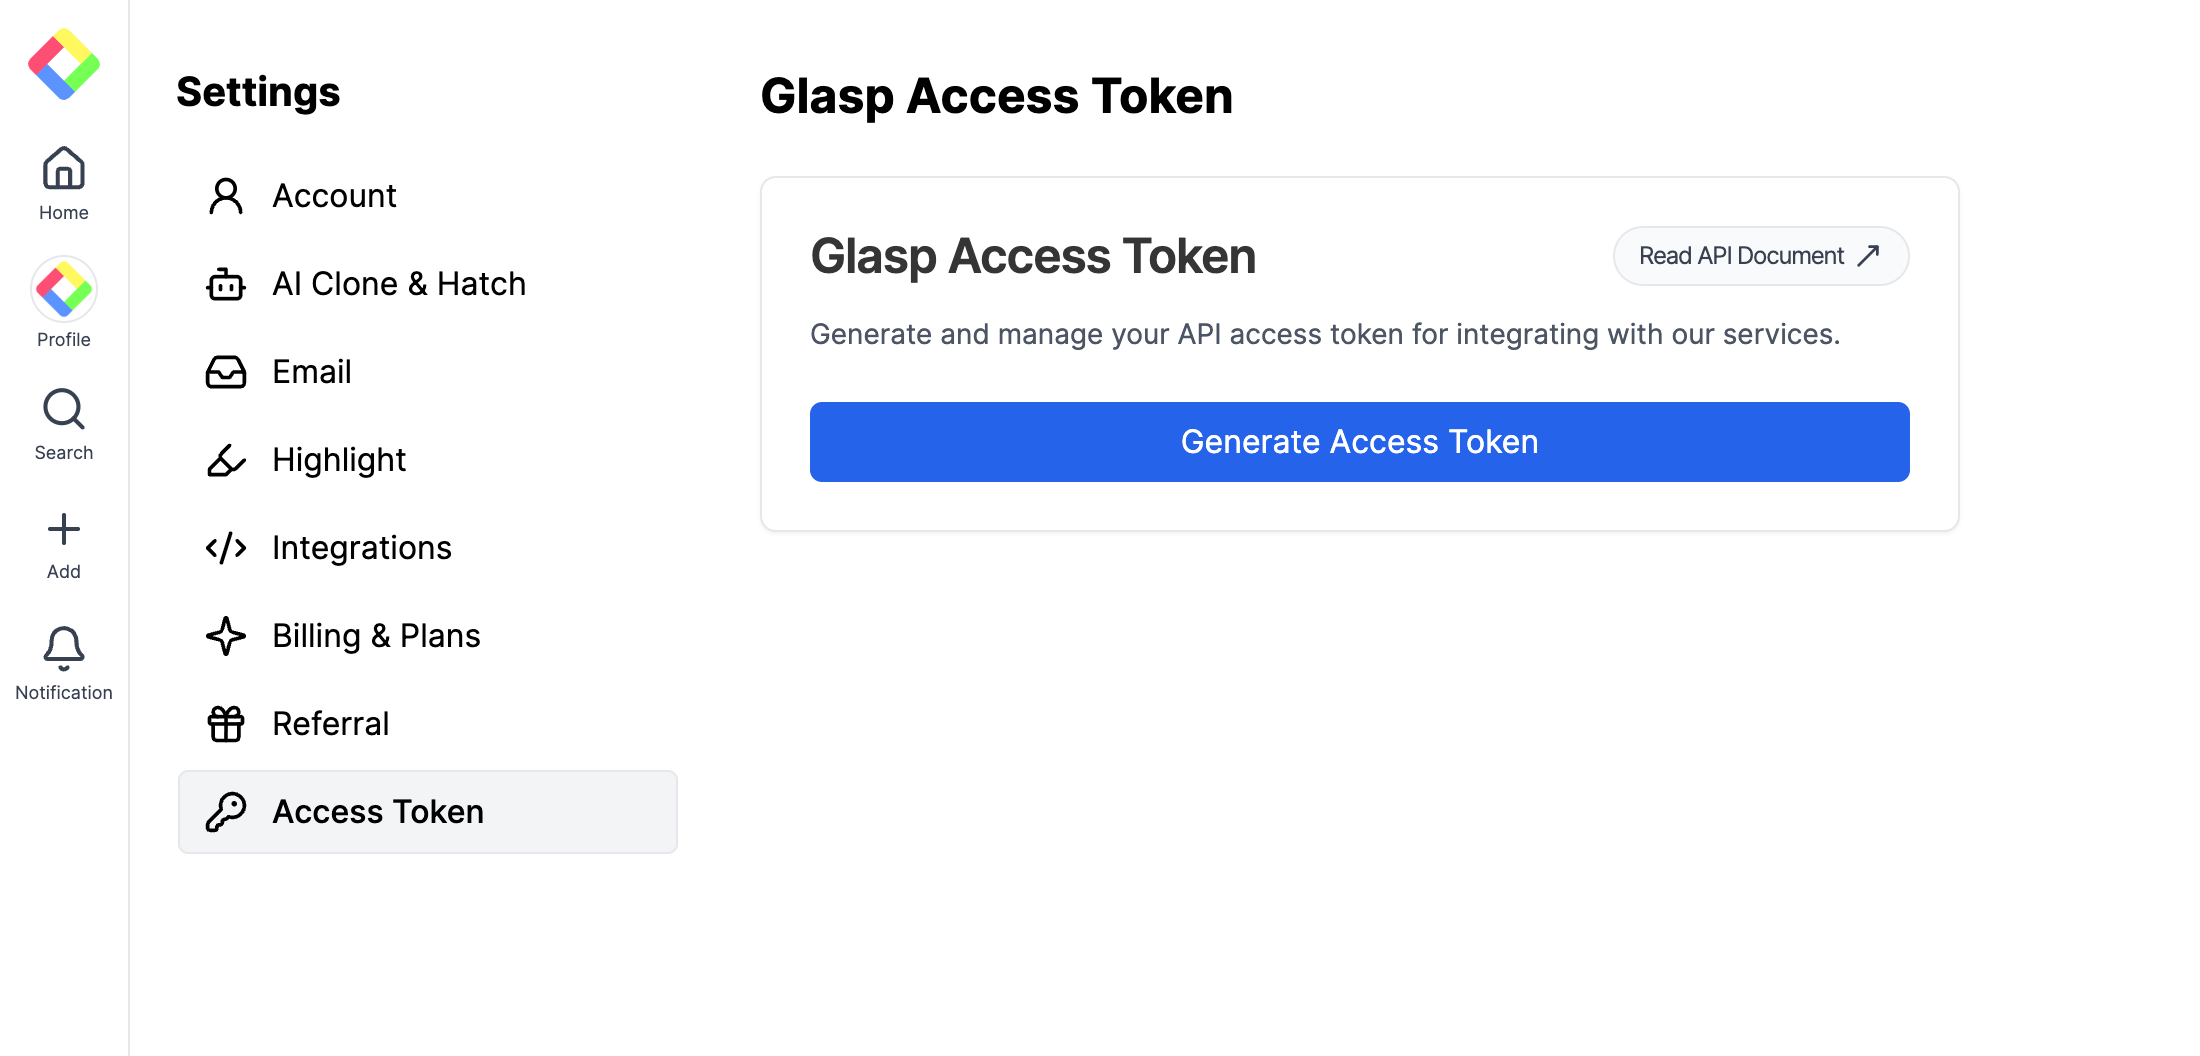
Back in Zapier, paste your token into the API Key field when prompted to connect your Glasp account.

💡 Keep your access token private. Don’t share it publicly or commit it to a public repository.
Step 4: Test the trigger
After connecting your Glasp account, Zapier will ask you to test the trigger. This step verifies that Zapier can successfully fetch your highlights from Glasp’s API.
In the trigger setup, select “New Document“ as the trigger event and click “Continue.”
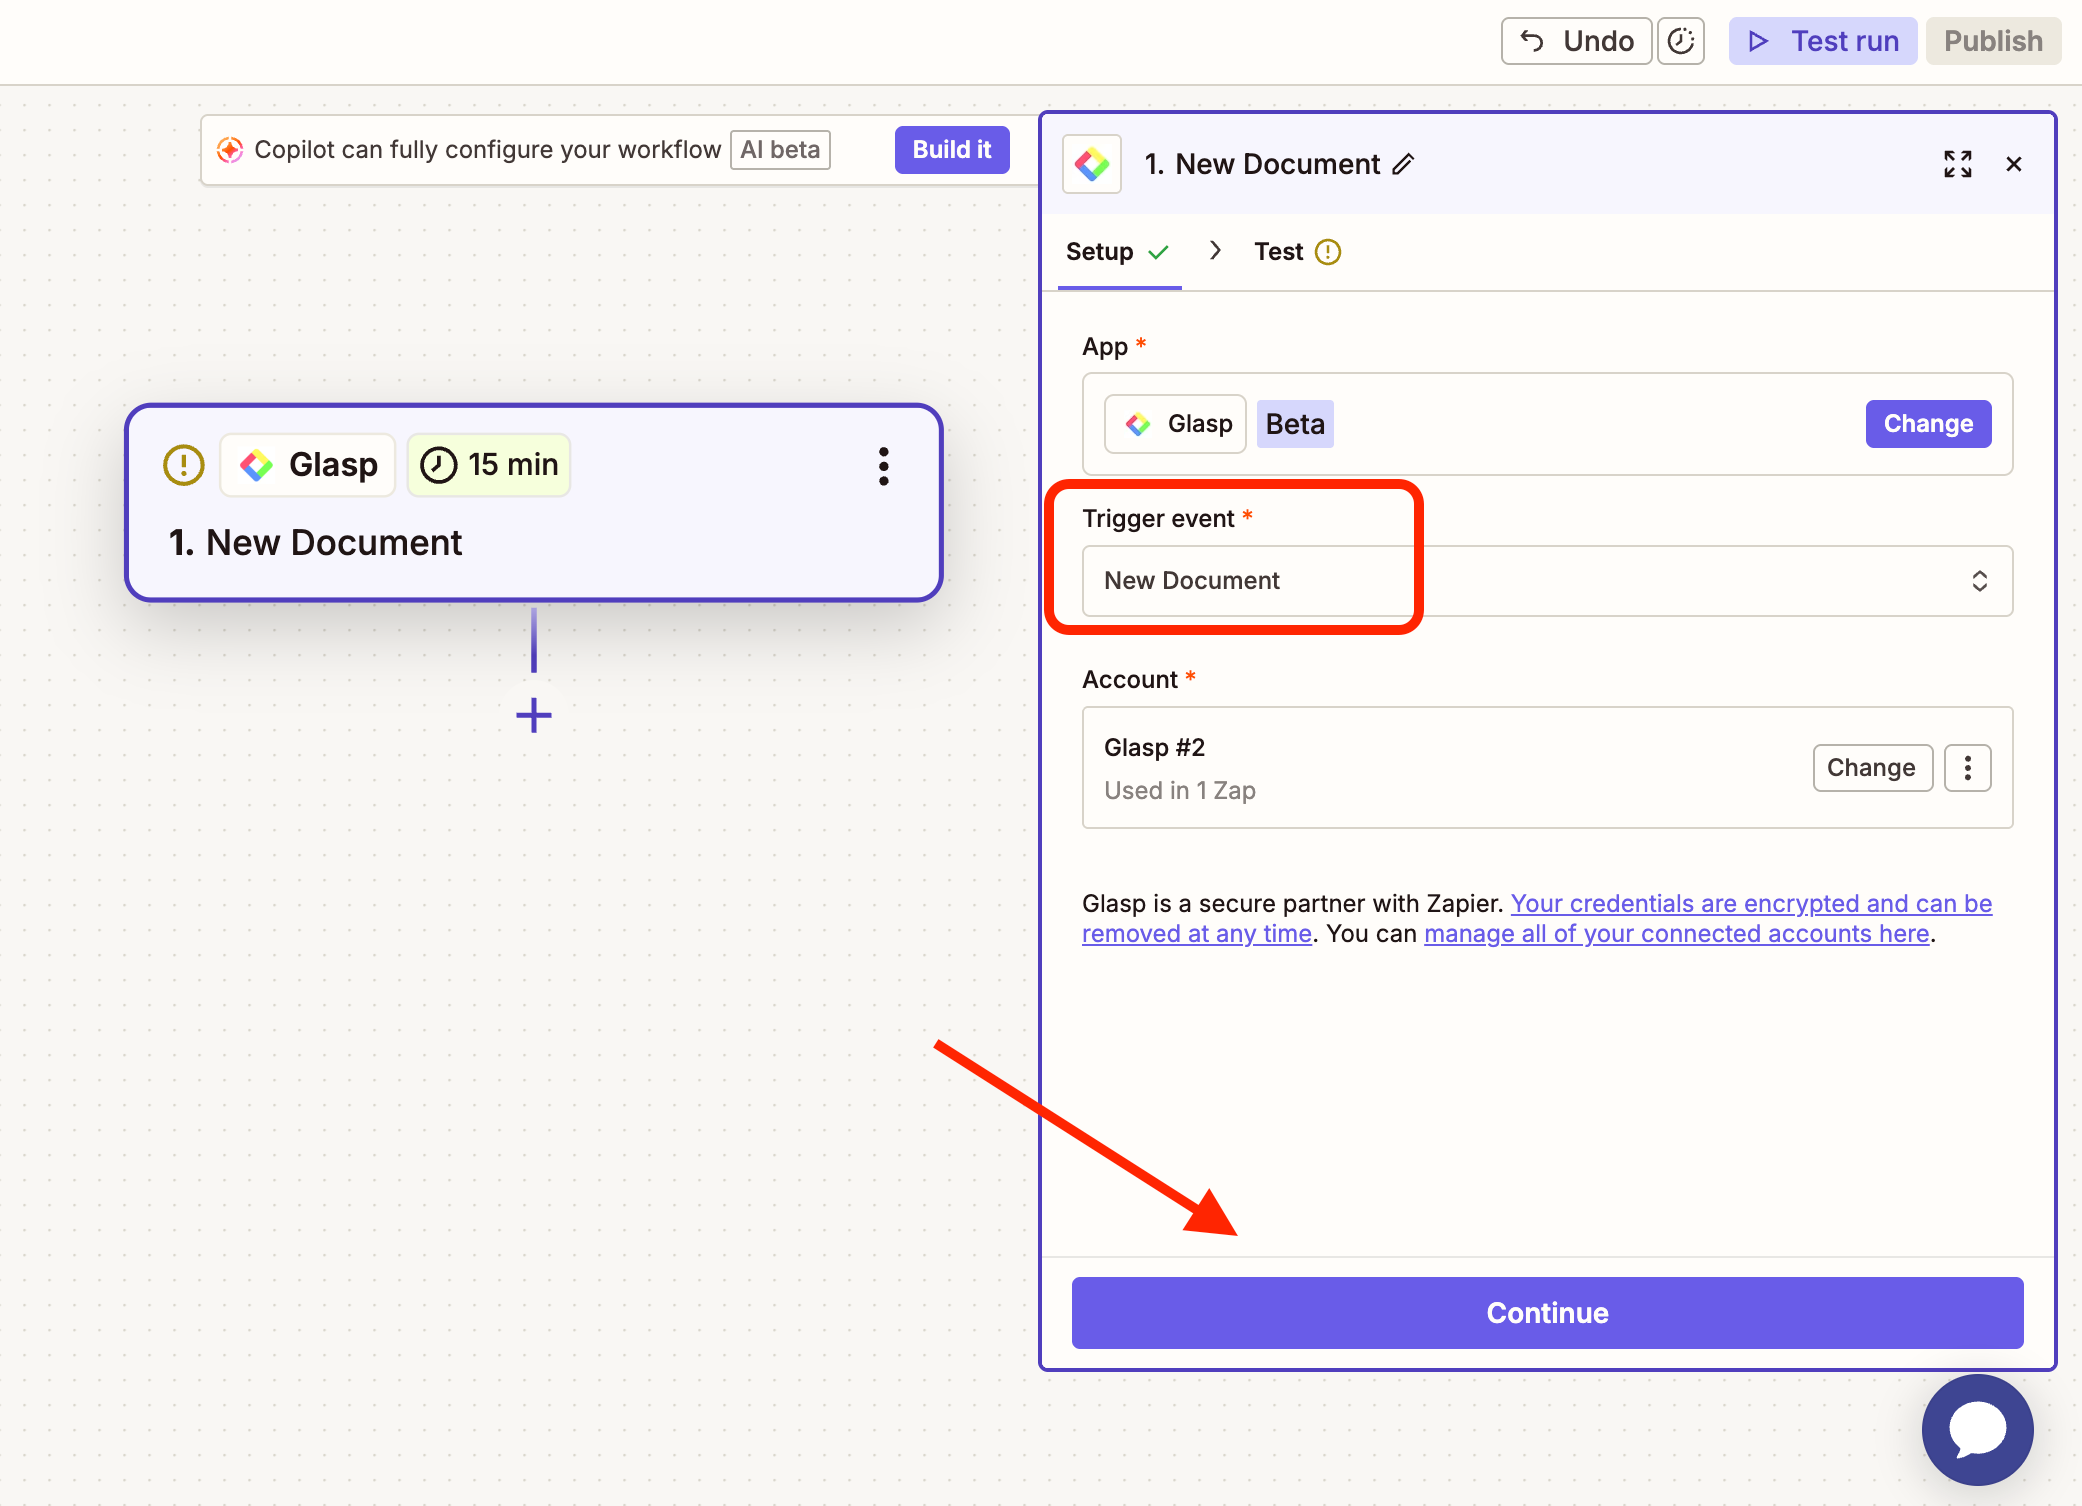
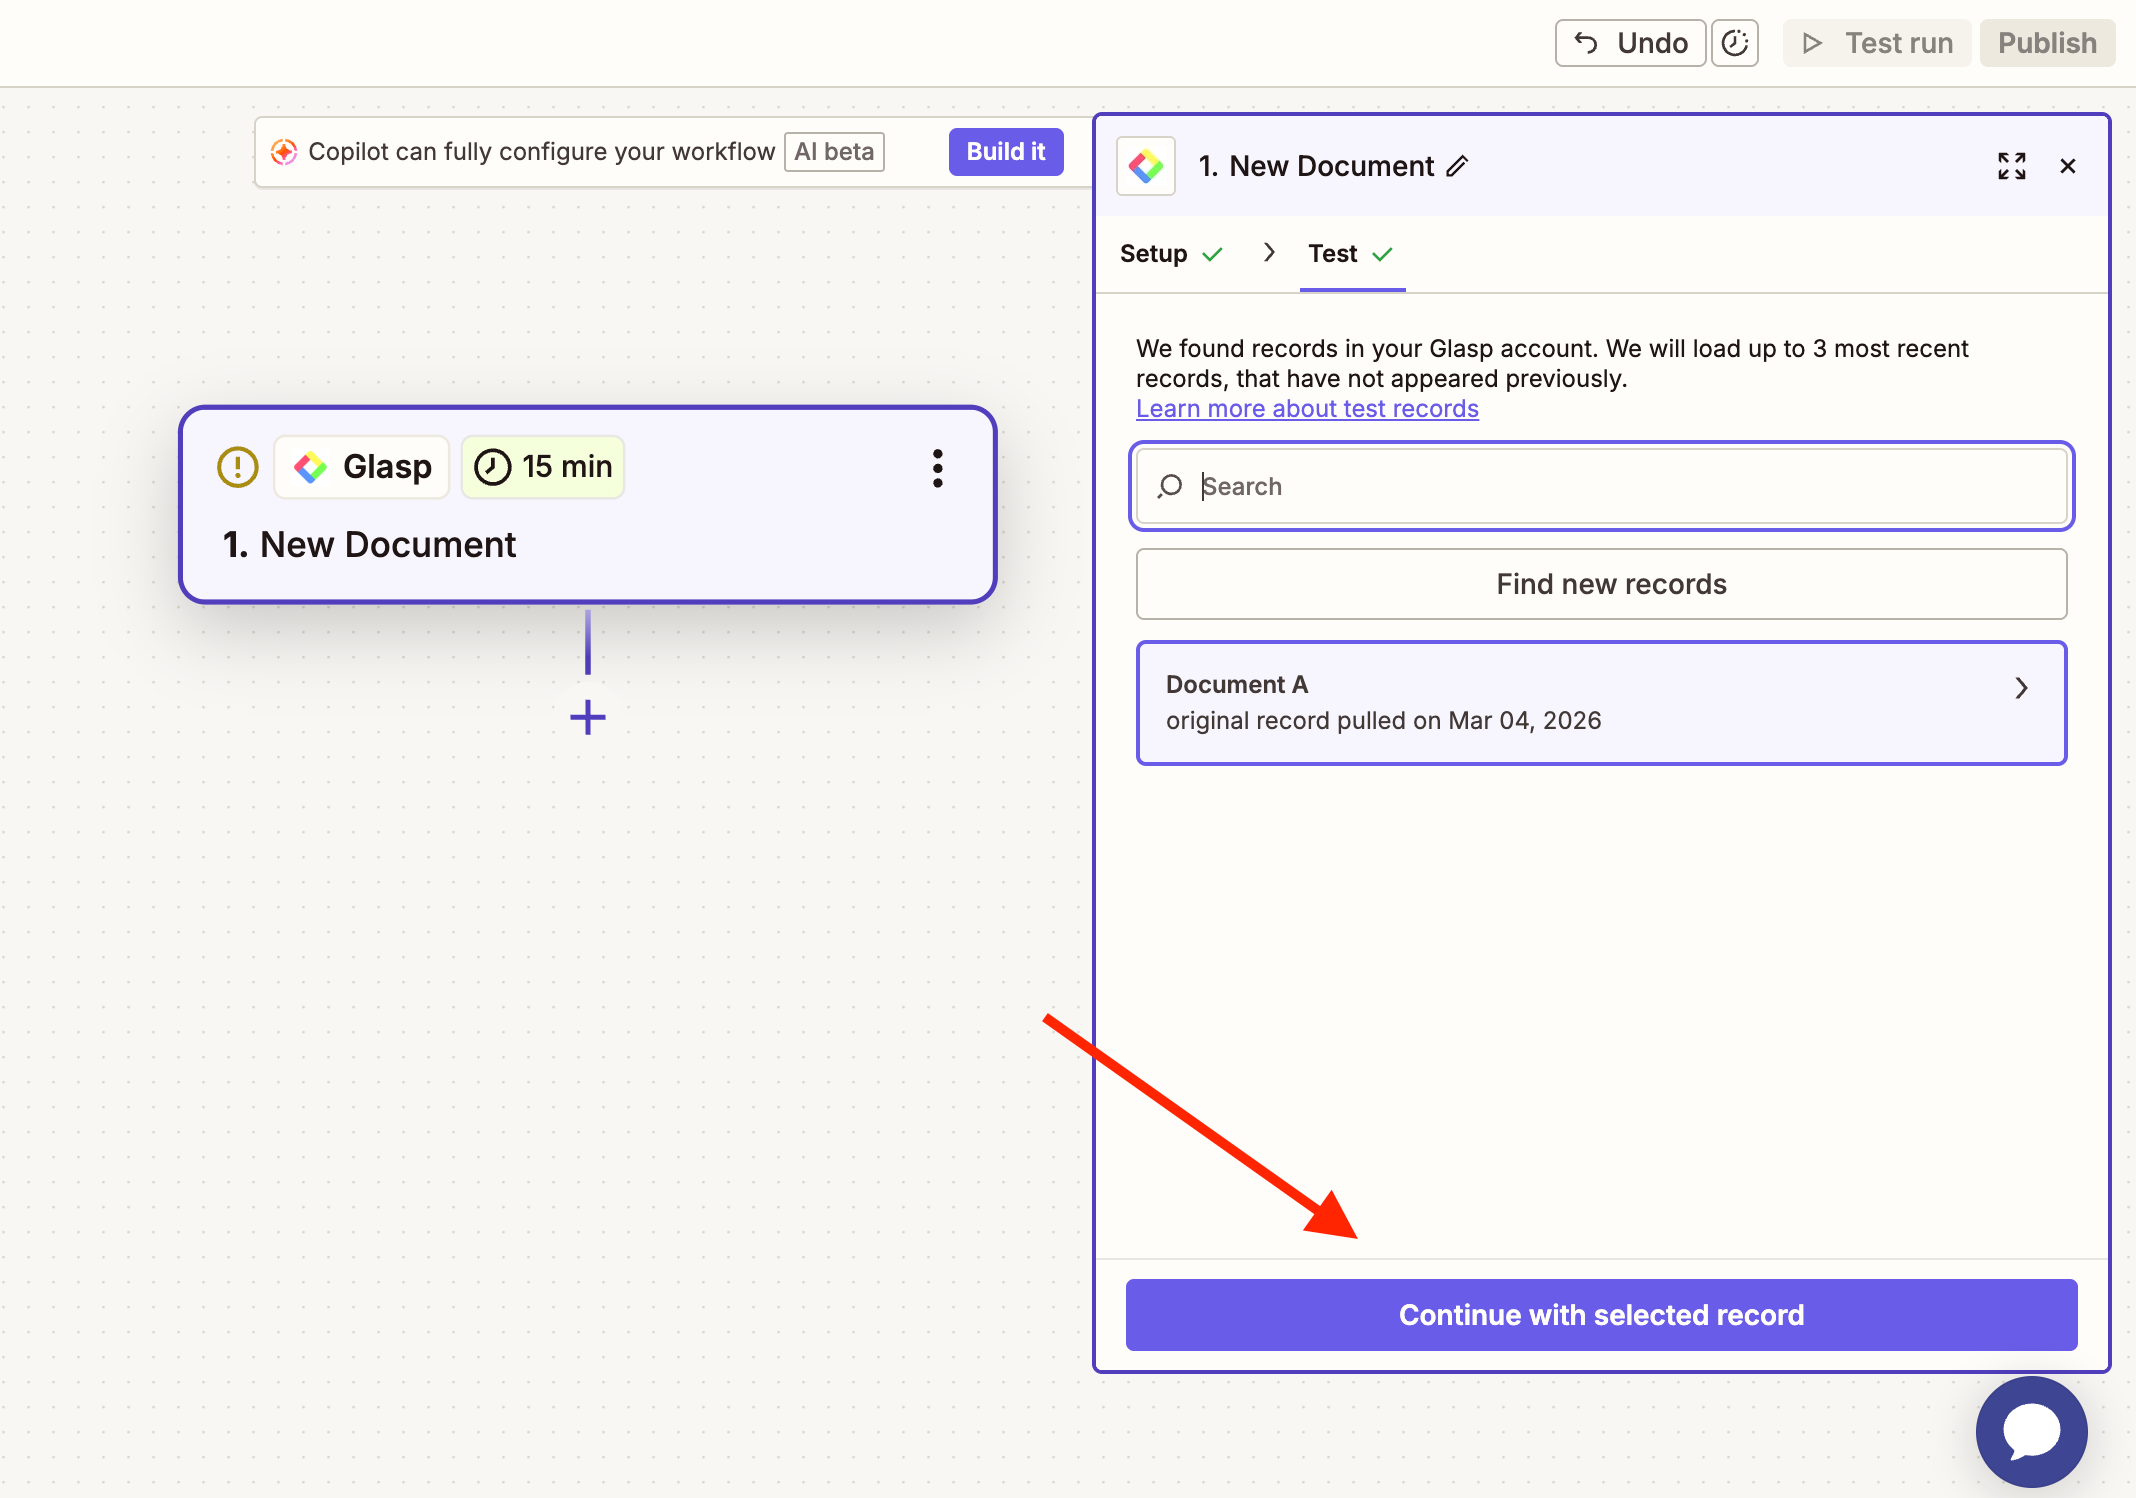
Click "Test trigger" and wait a few seconds. Zapier will pull in your most recent highlights as sample data. You should see your highlight text, the source URL, page title, tags, and any notes you've added.

If the test fails, double-check that:
Your access token is correct (go back to Step 2 and regenerate if needed)
You have at least one highlight saved in your Glasp account
Once the test successfully finishes, click “Continue with selected record.” This tells Zapier to use this highlight as sample data for configuring the next step — your destination app.
Step 5: Connect Your Destination
Now add an action step — the app where your highlights will be sent. Click the “+” button below the trigger, search for your destination app, and select it.
Choose your destination app and follow the example below. If your app isn’t listed here, the setup process is similar — select your app, connect your account, and map the Glasp data fields.
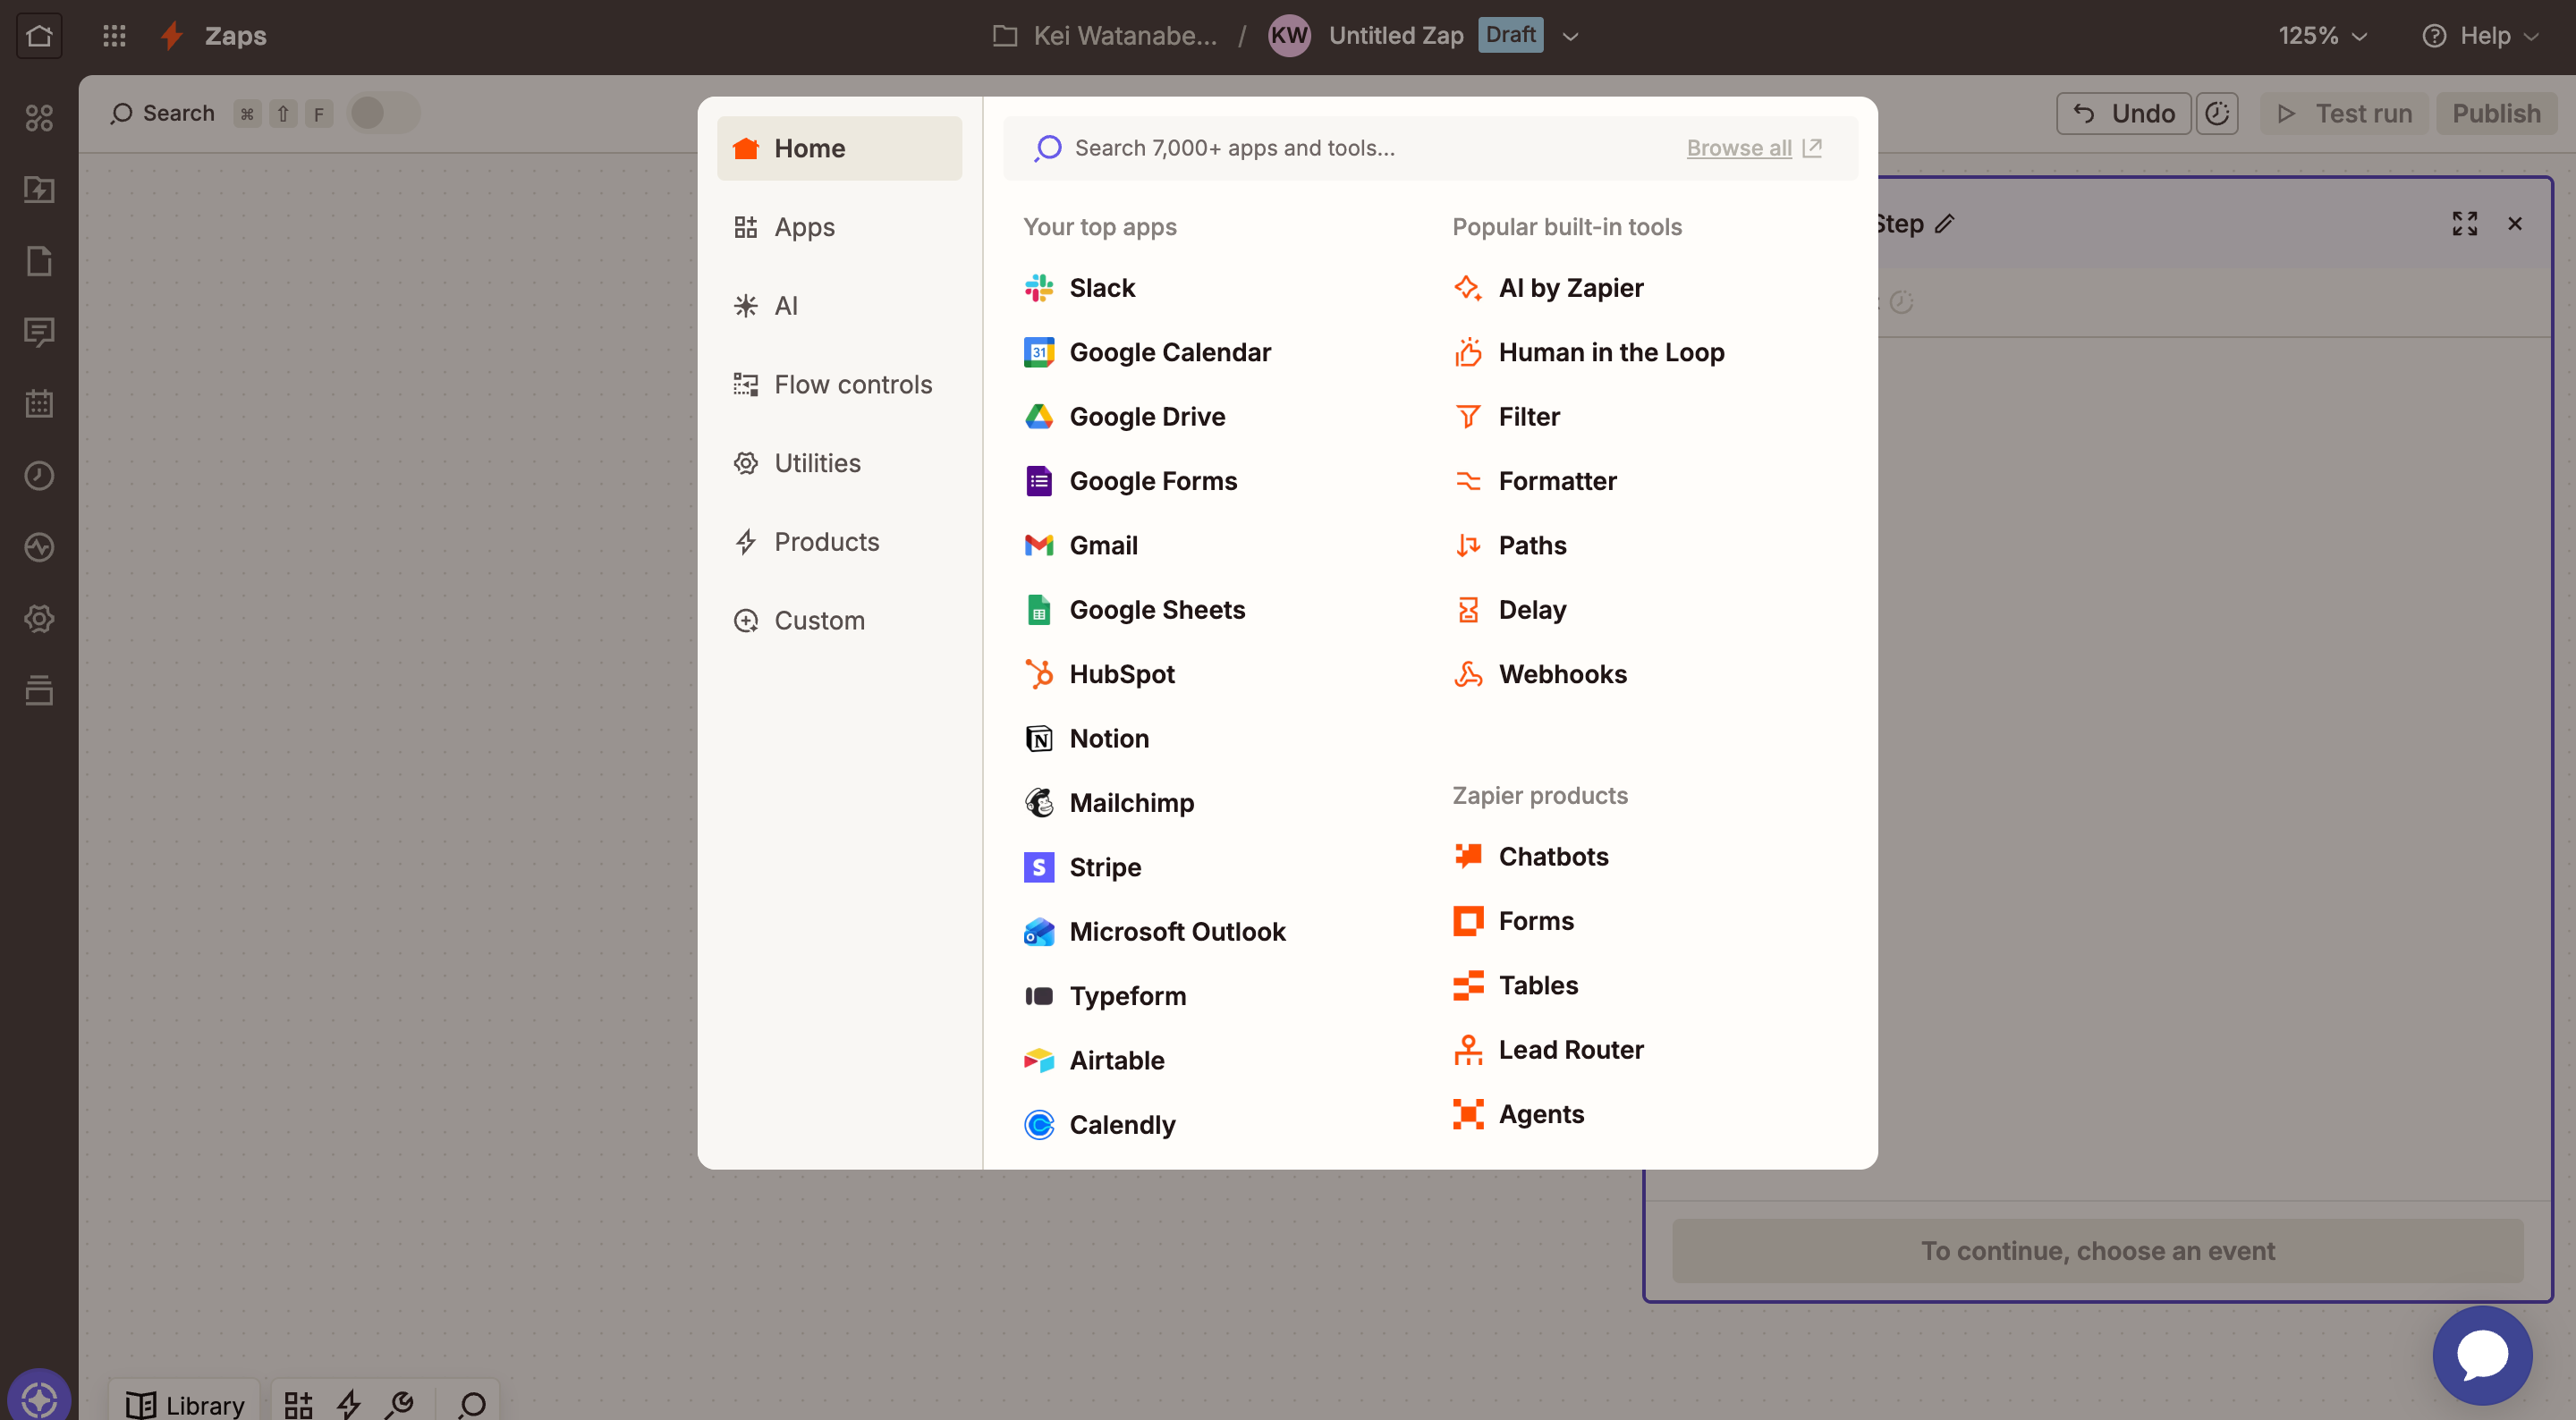
Below are setup instructions for the most popular destinations.
Example: Slack
After selecting Slack, choose “Send Channel Message” as an action event. Then, click “Sign in” to connect to Slack.
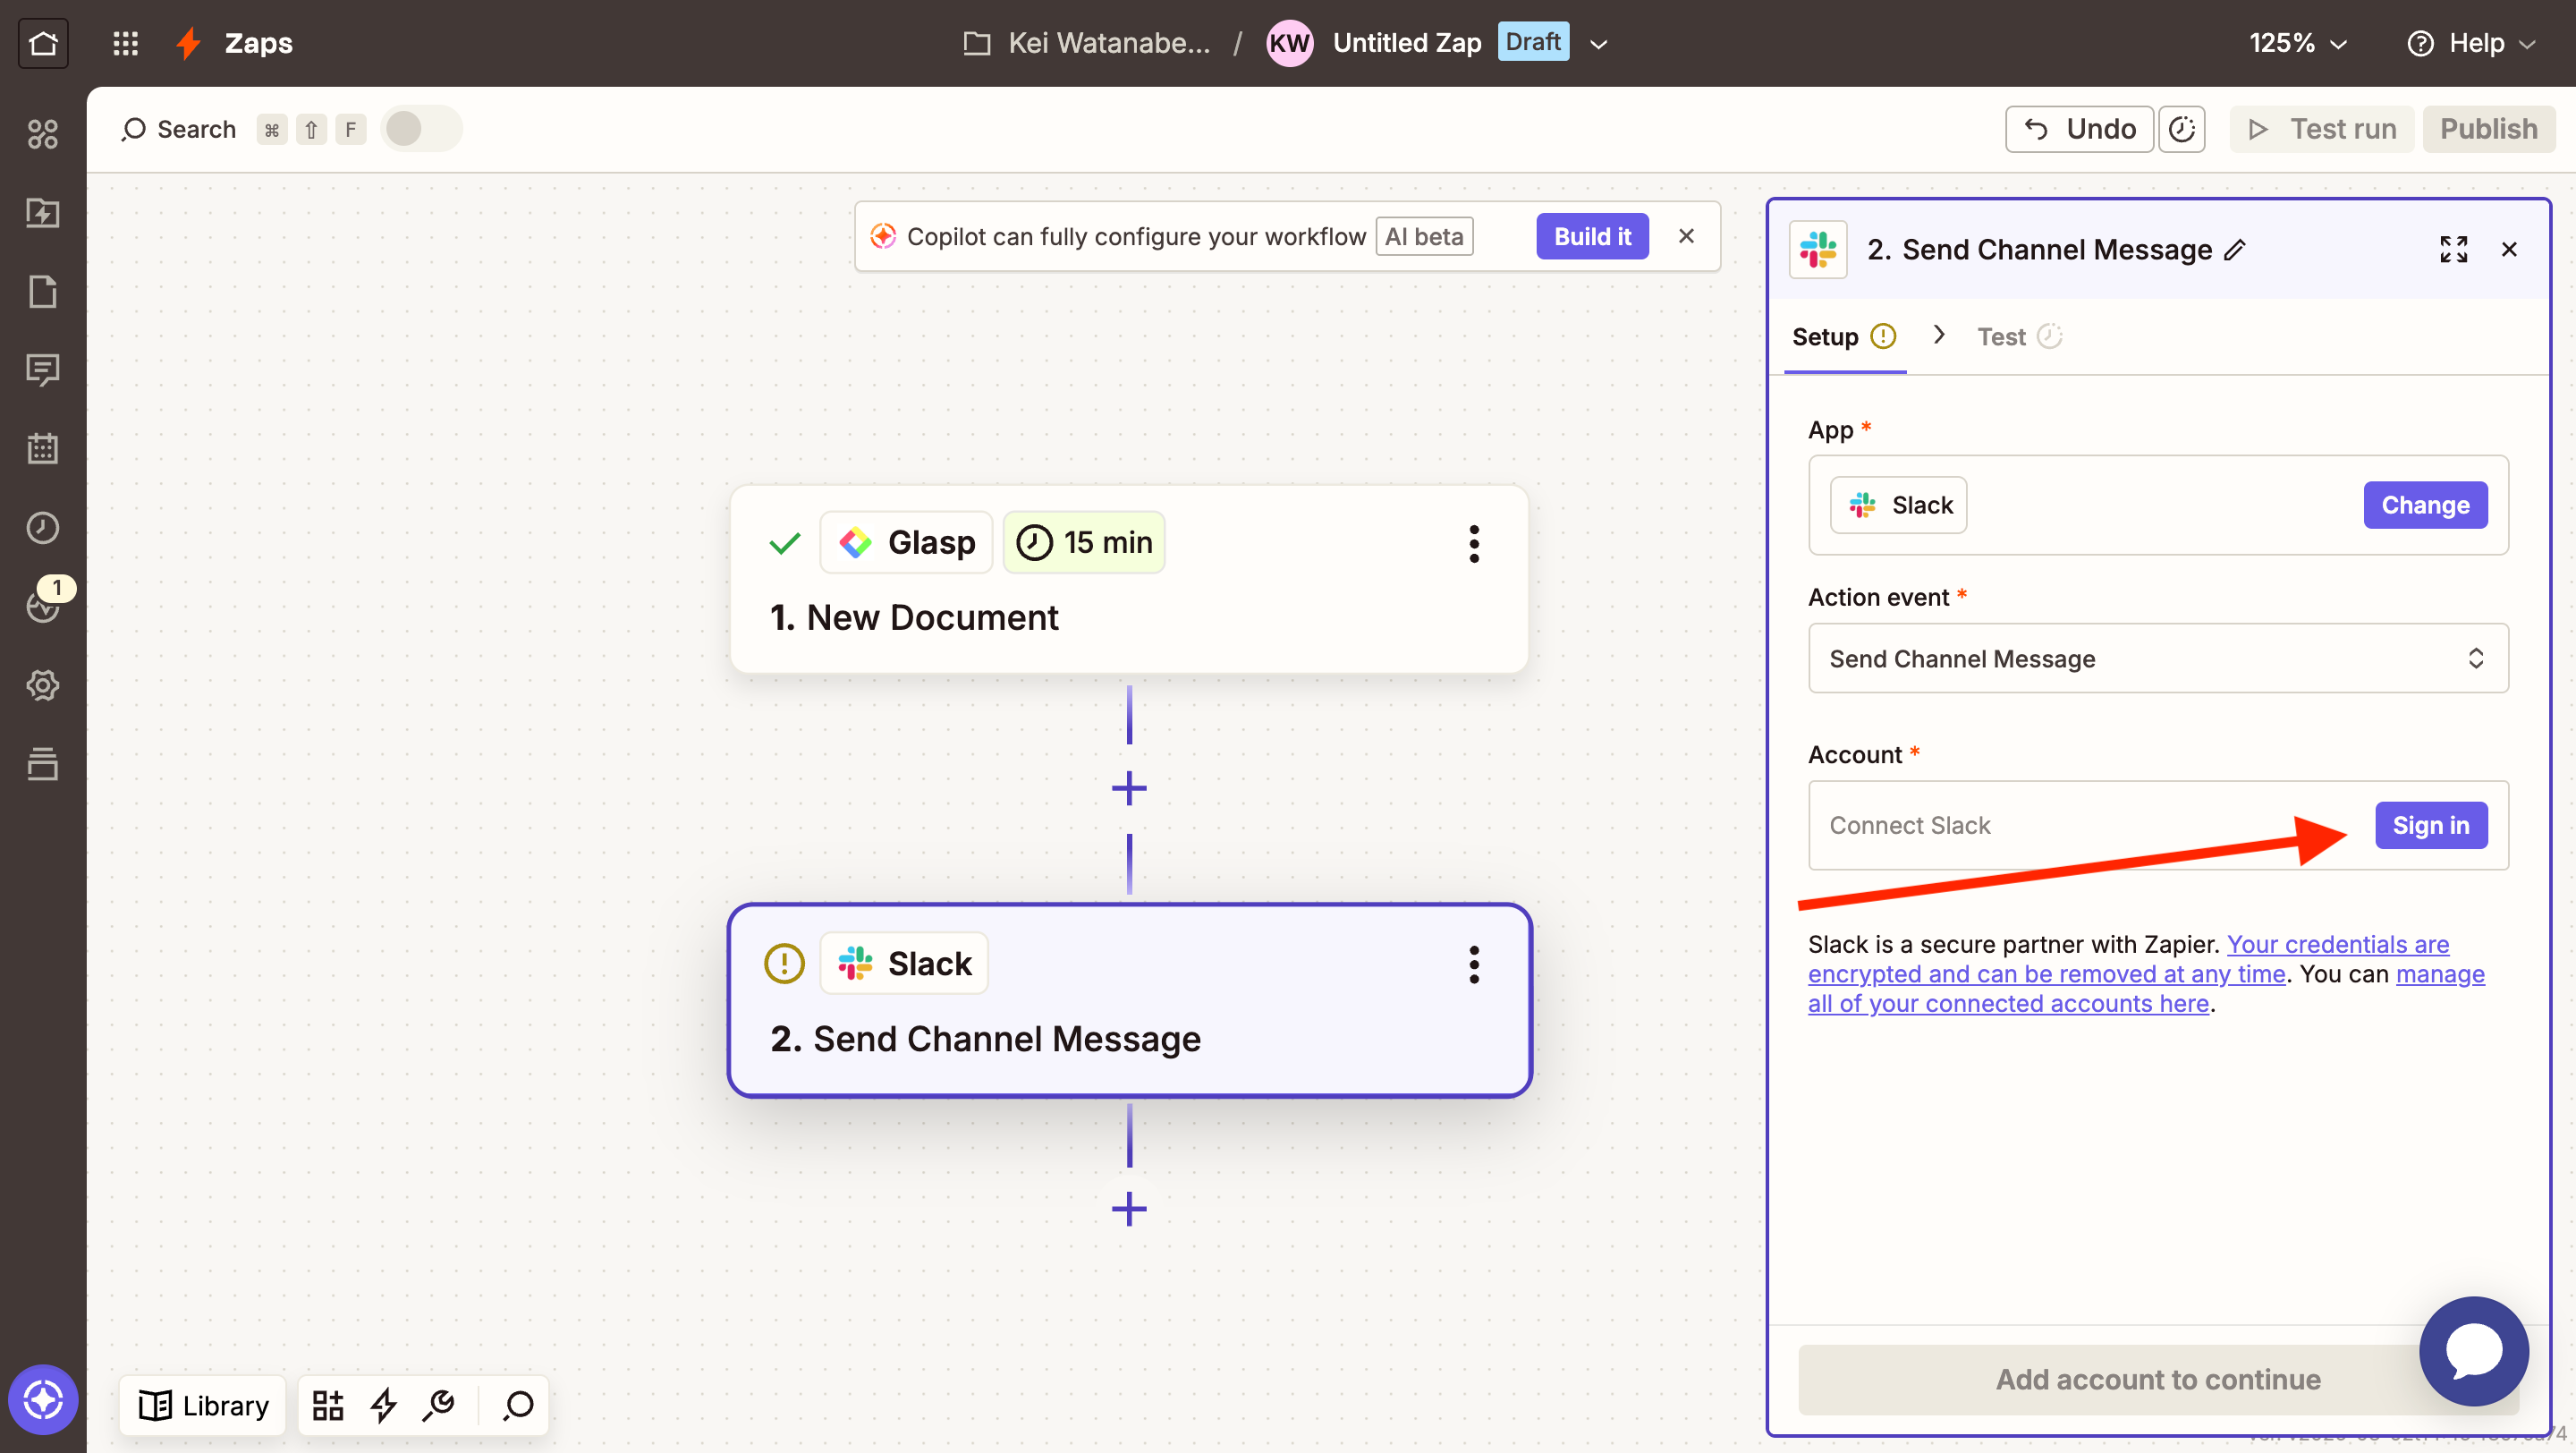
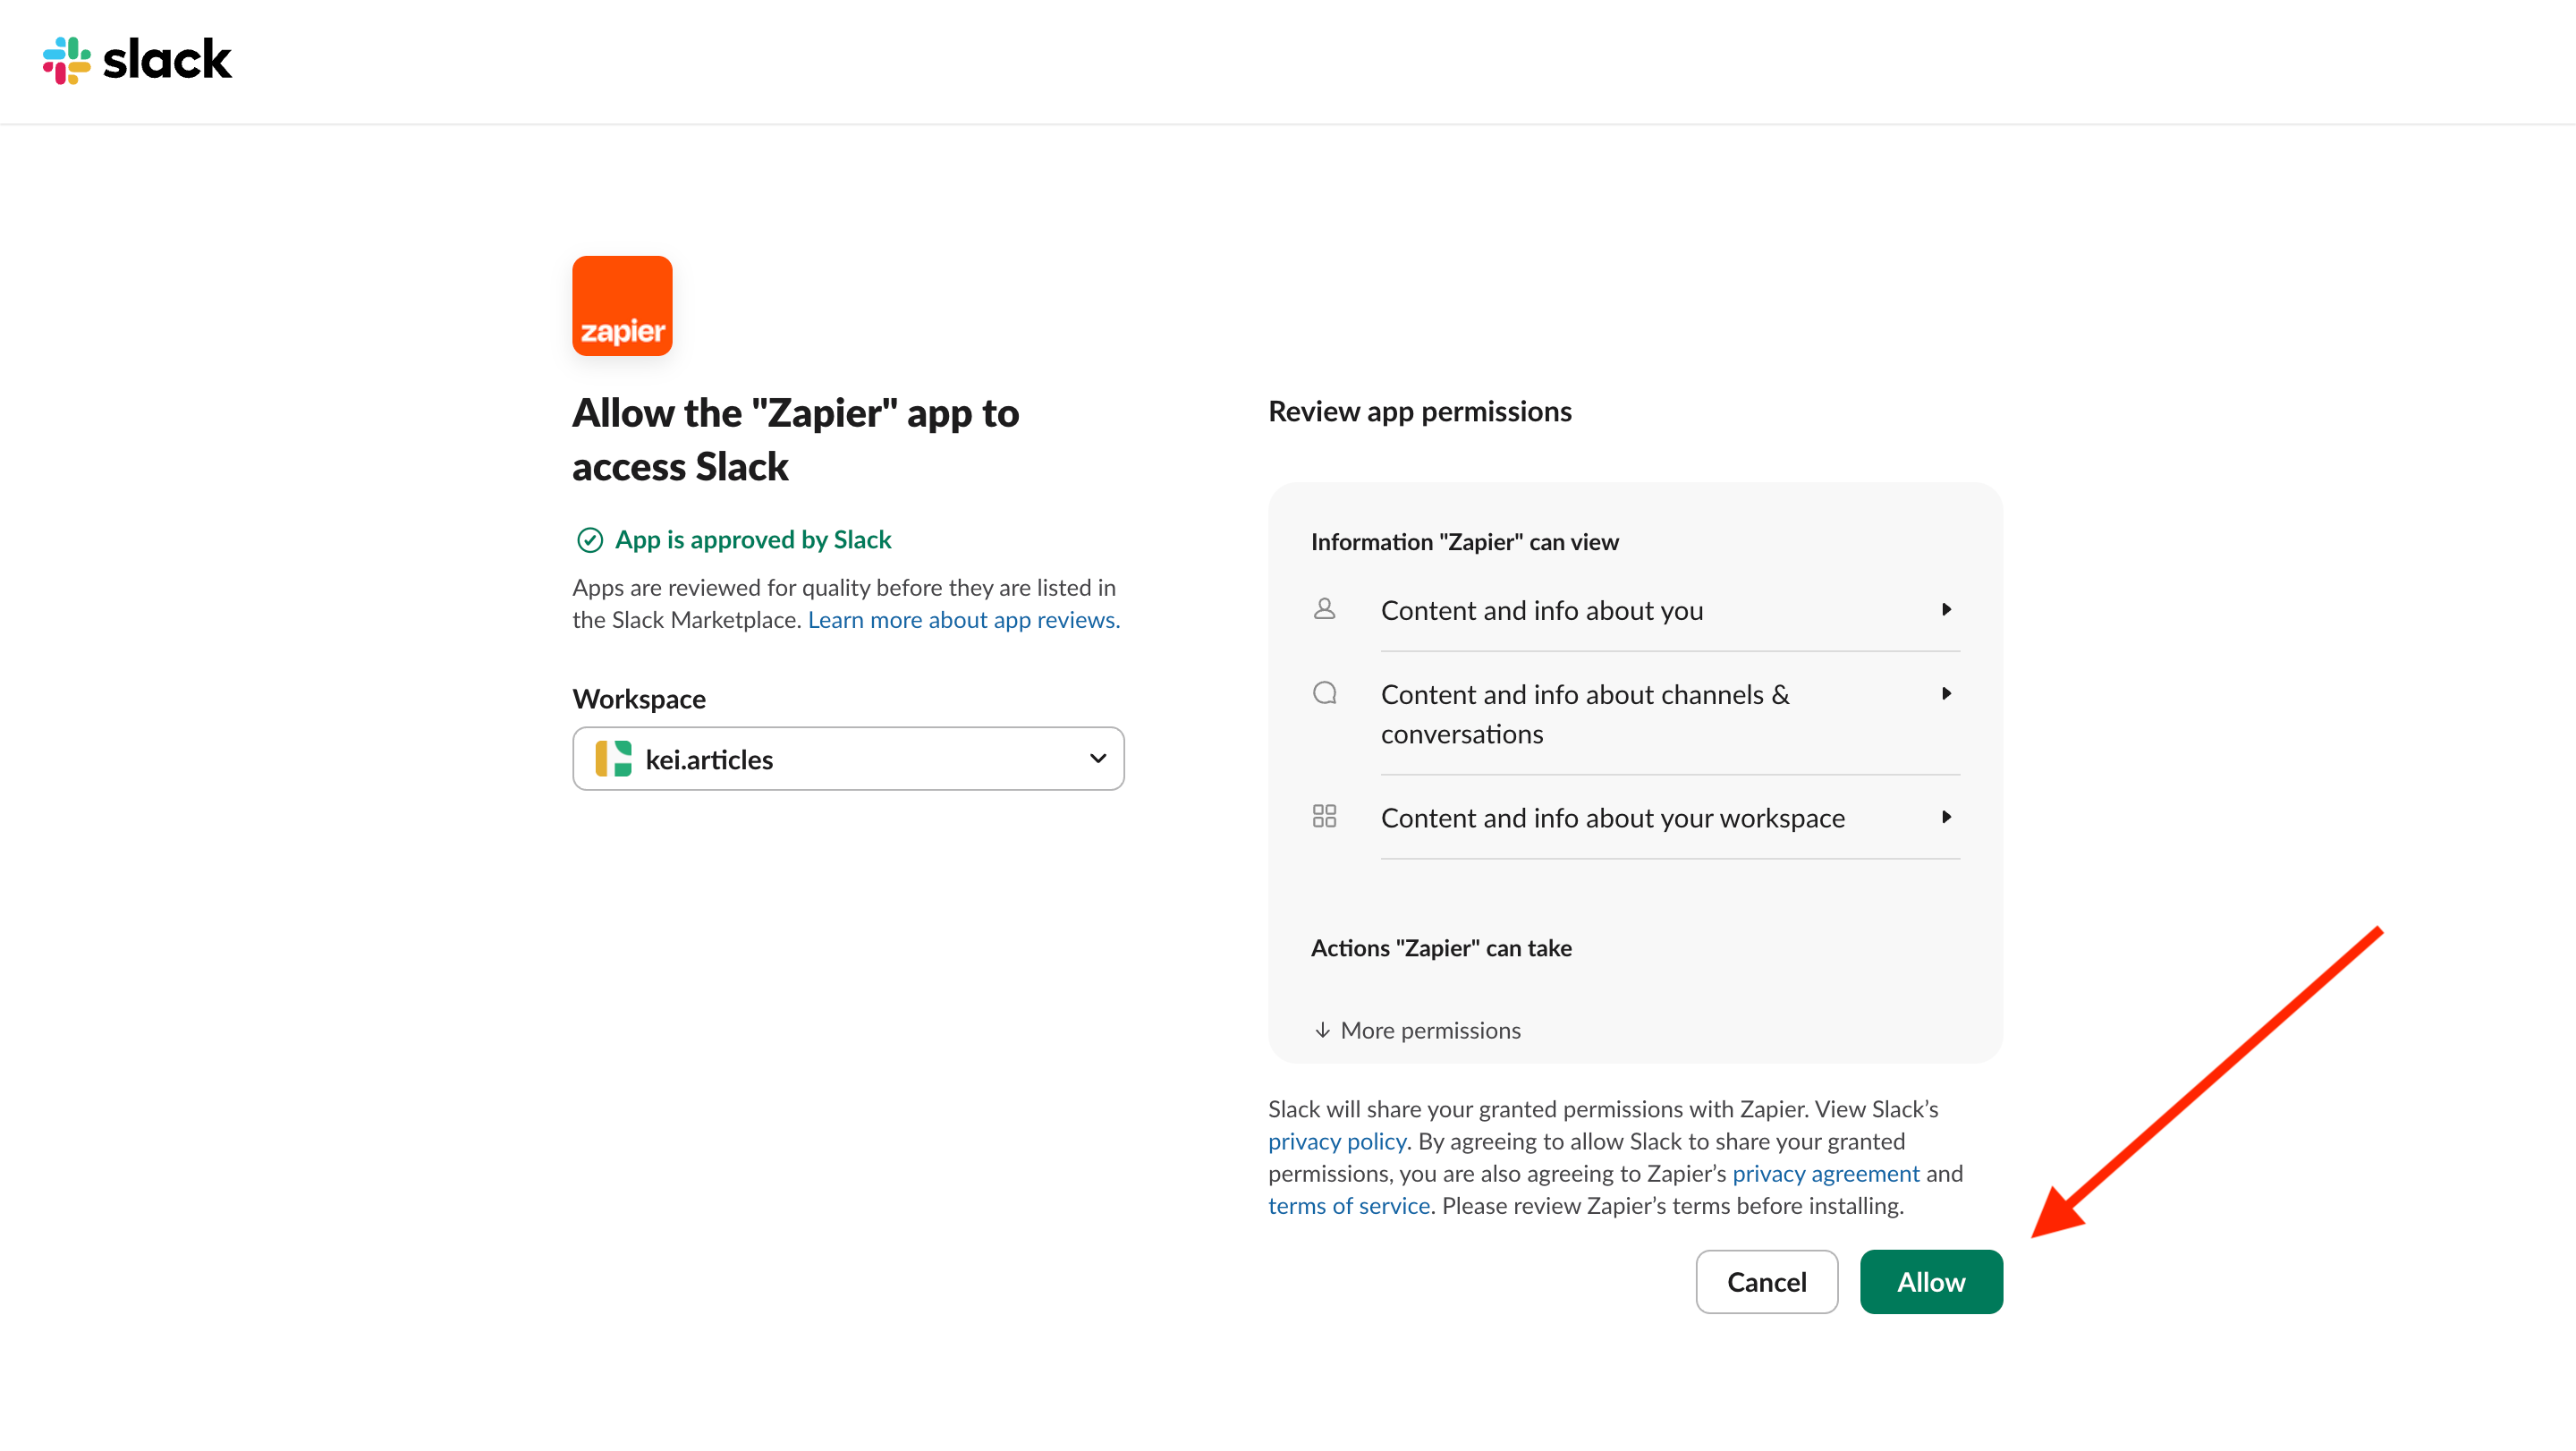
A Slack authorization window will appear. Select your workspace and click "Allow" to grant Zapier access.
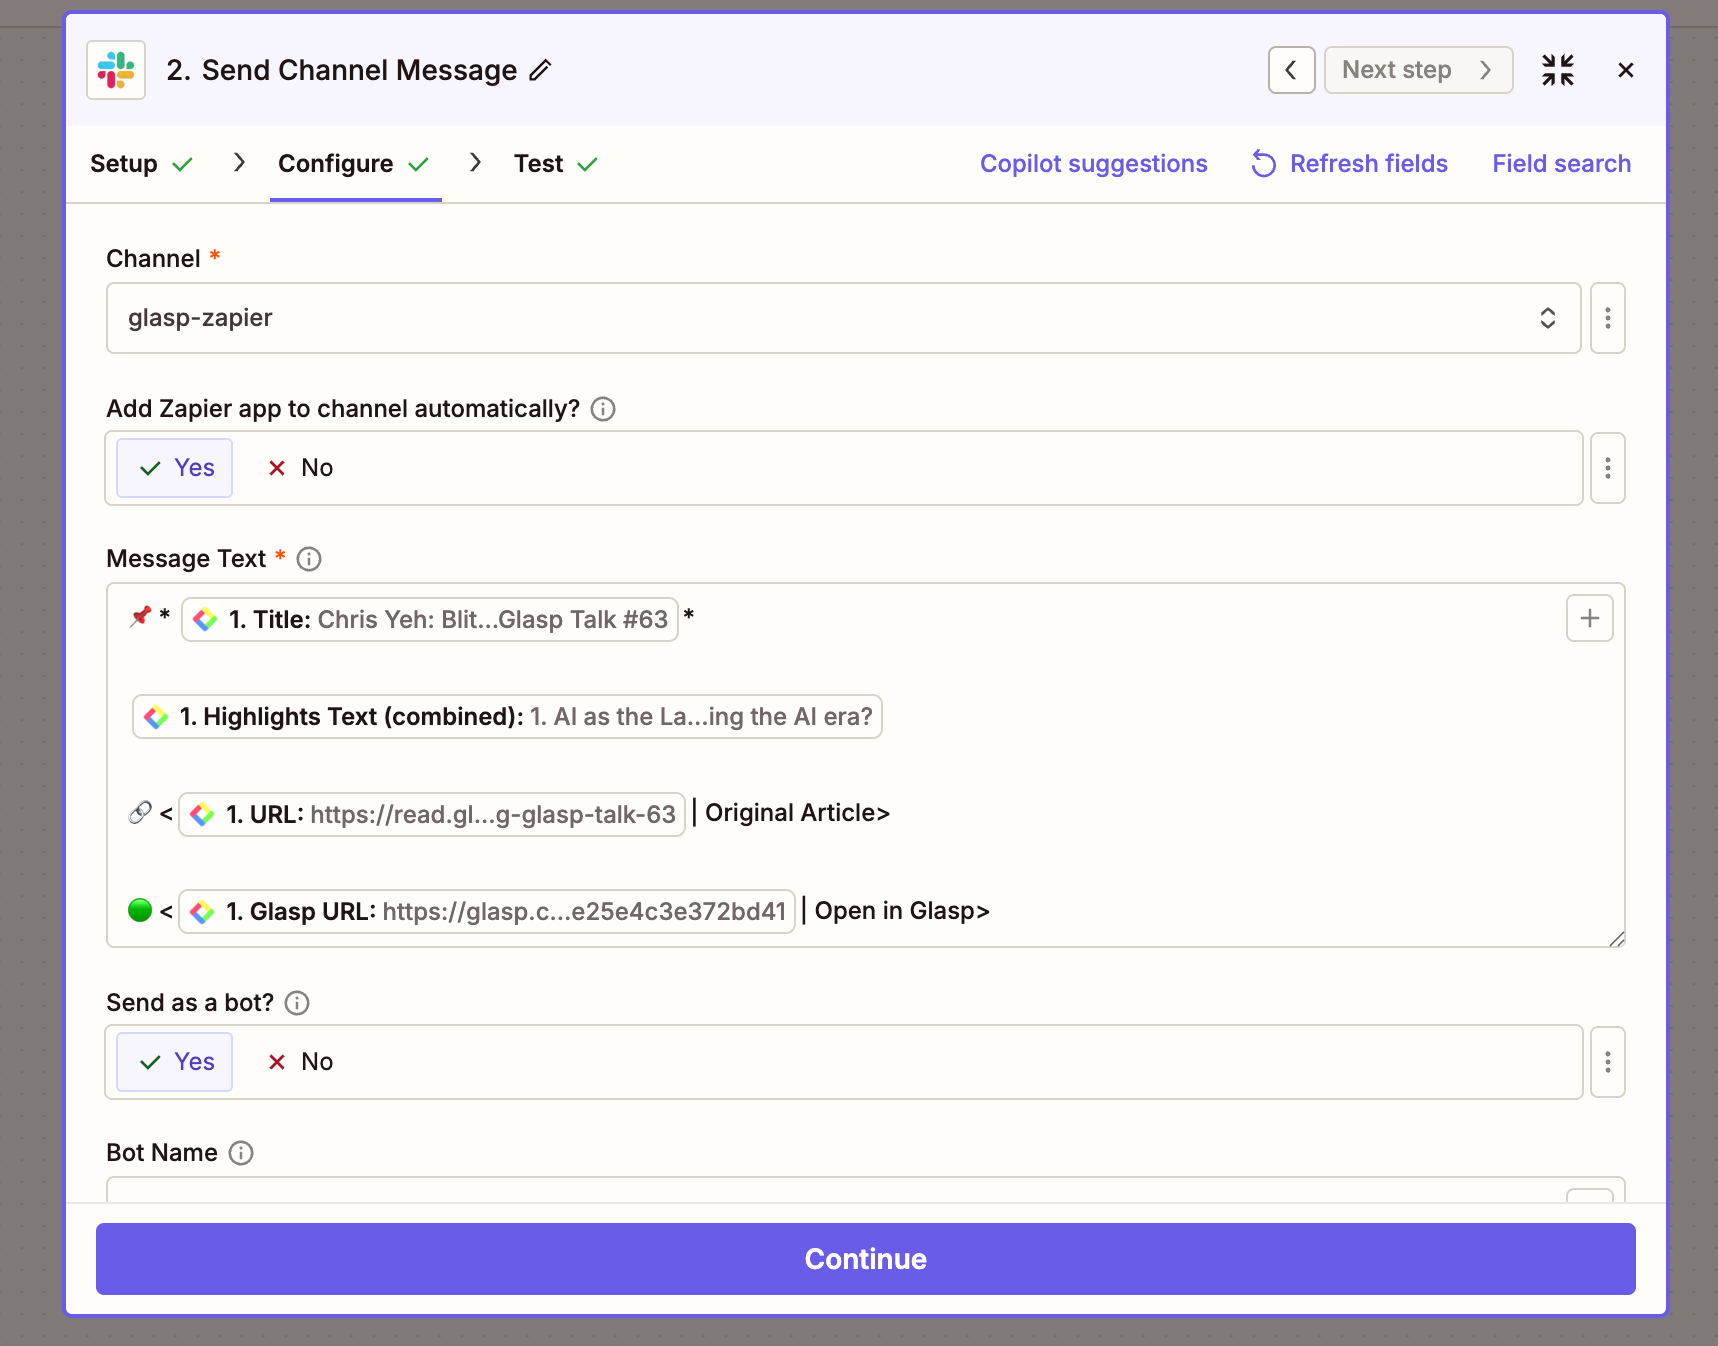
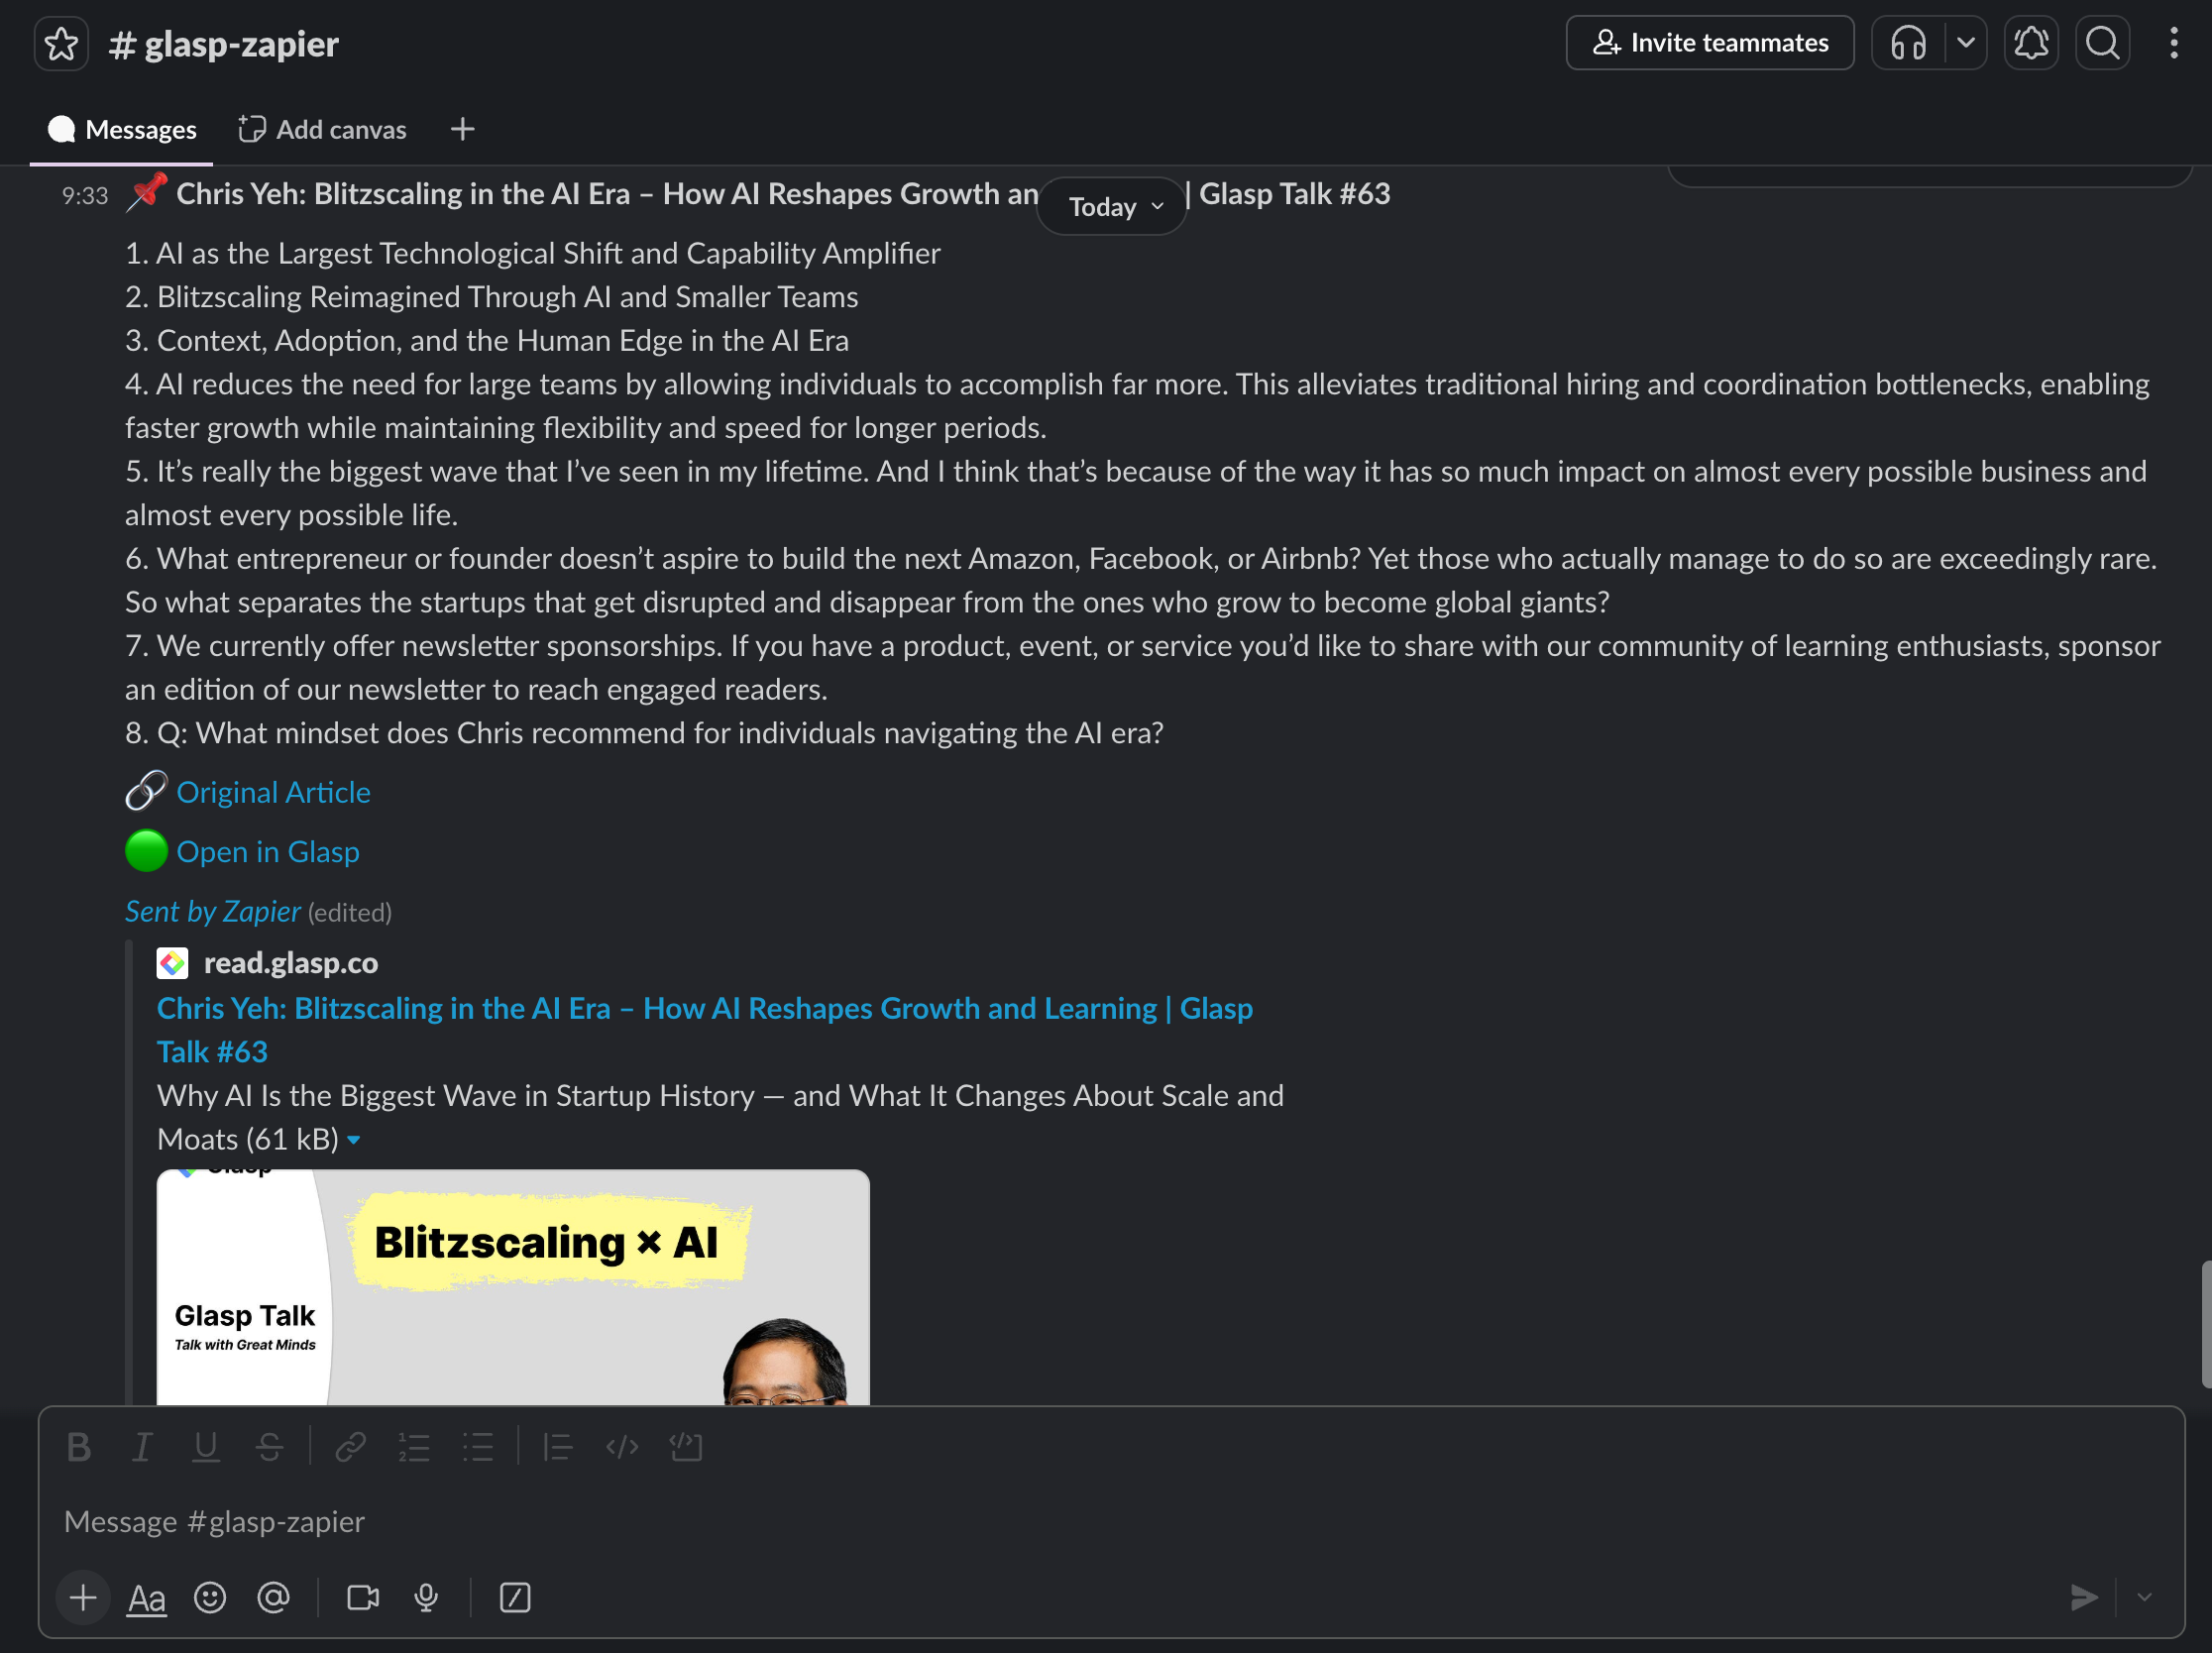
Connect your Slack workspace and choose which channel should receive your highlights. You can map the Glasp data fields to your Slack message format:
Channel: Select the channel (e.g.,
#highlightsor#reading-notes)Message Text: Map the highlight text, page title, and URL from the trigger data
For example, you could format your message as:
📌 * [title]*
Highlights Text (combined)
🔗 < [URL] | Original Article >
🟢 < [Glasp URL] | Open in Glasp >
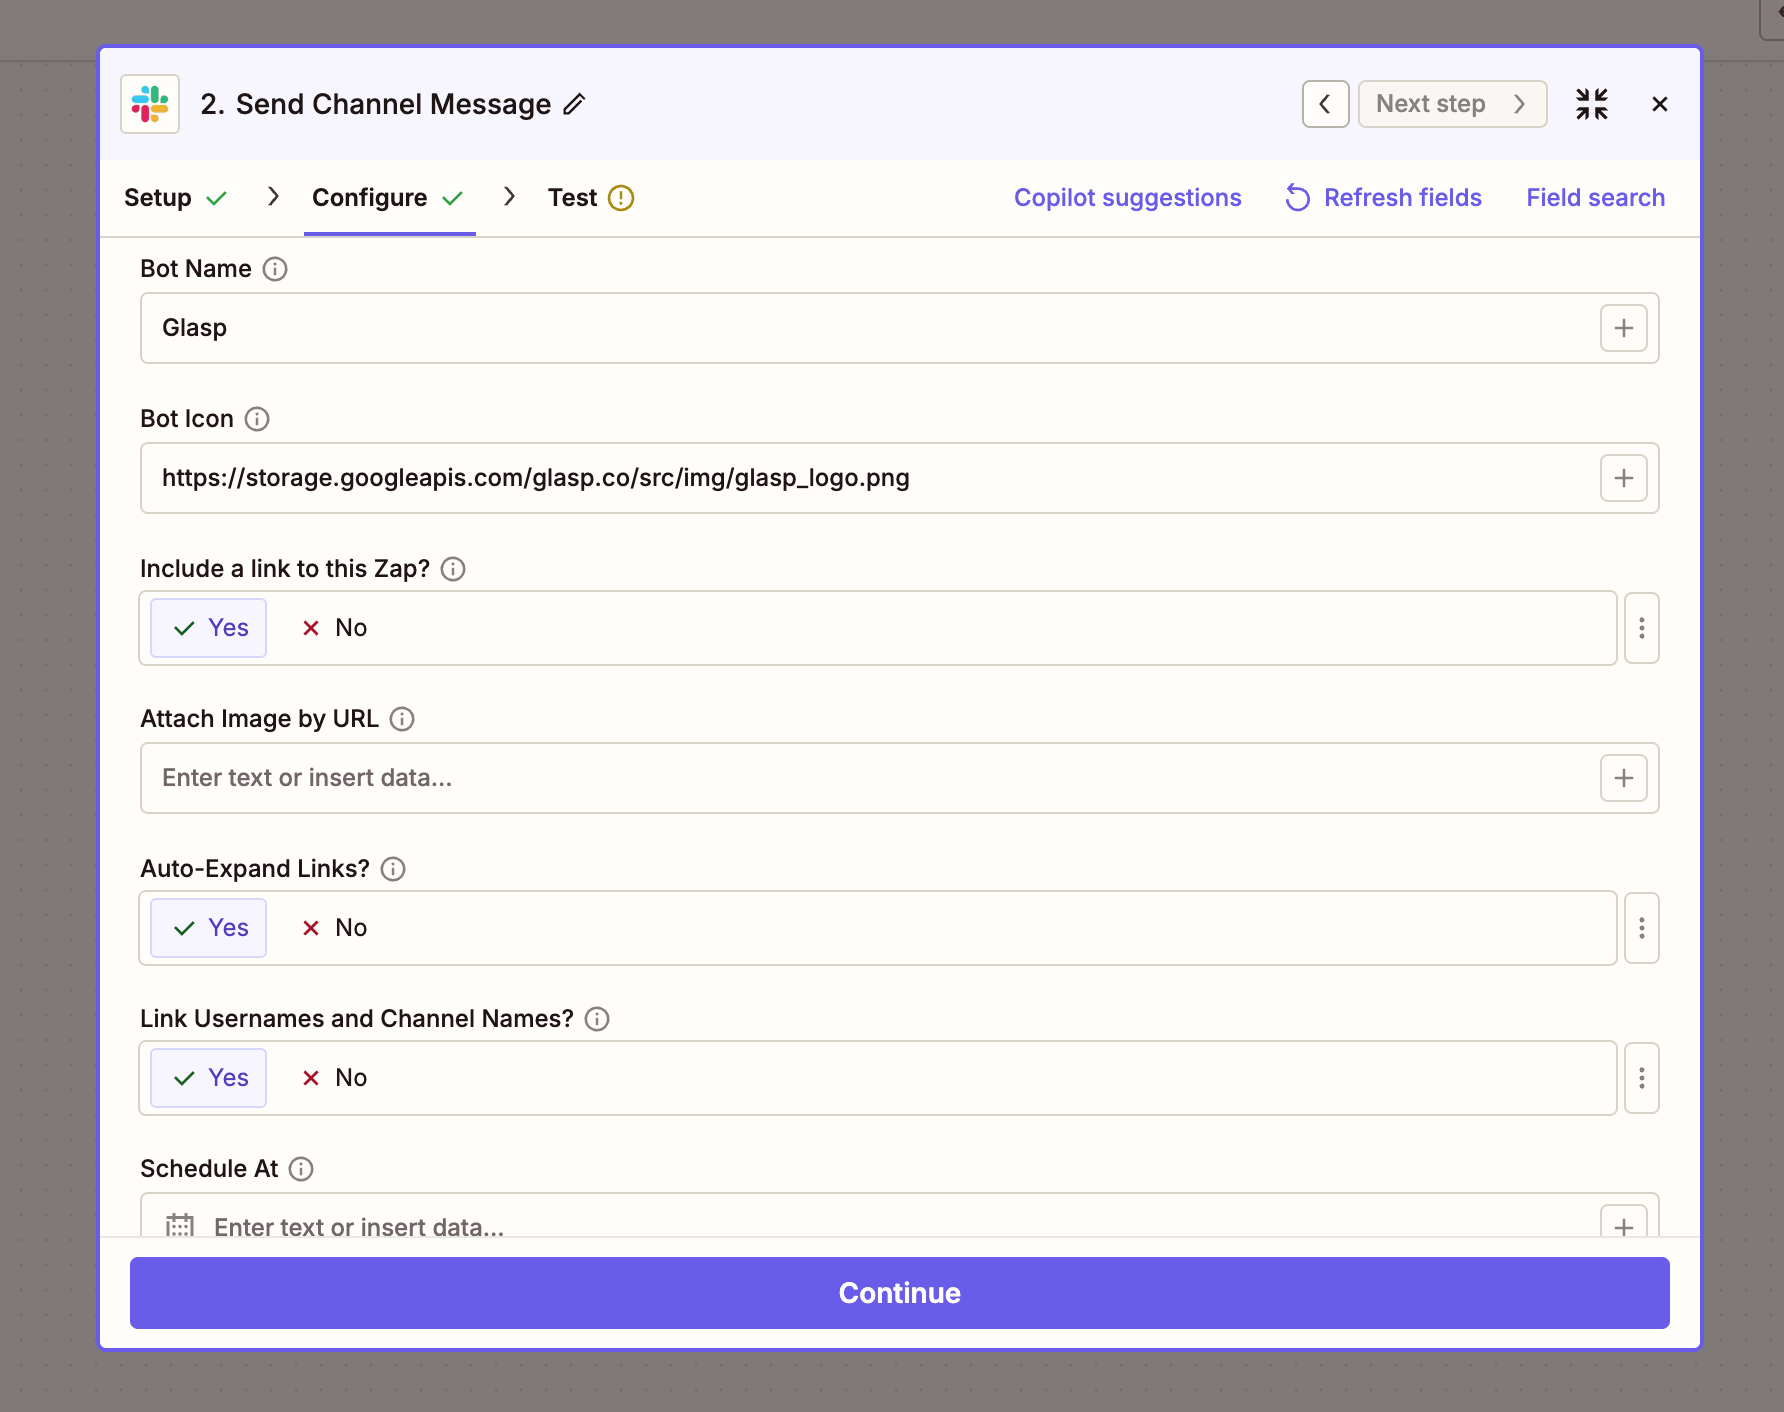
You can also customize how the message appears in Slack. Scroll down in the configuration panel to find these optional settings:
Bot Name: Change this to “Glasp” (or any name you prefer) so you can easily identify highlight notifications in your channel.
Bot Icon: Paste the Glasp logo URL to give the bot a recognizable icon:
https://storage.googleapis.com/glasp.co/src/img/glasp_logo.pngAuto-Expand Links: Set to Yes so that URLs in your highlights automatically show a preview in Slack.
The rest of the settings can be left as default. Click “Continue” to proceed to testing.
After configuring the message fields, click “Continue” to move to the Test tab. Click “Test step” to send a test message to your Slack channel. Zapier will send a real message using your most recent Glasp highlight data.
If the test succeeds, you’ll see “A Message was sent to Slack” with the output data showing your channel ID and message content. Go to your Slack channel and confirm the message was delivered correctly.
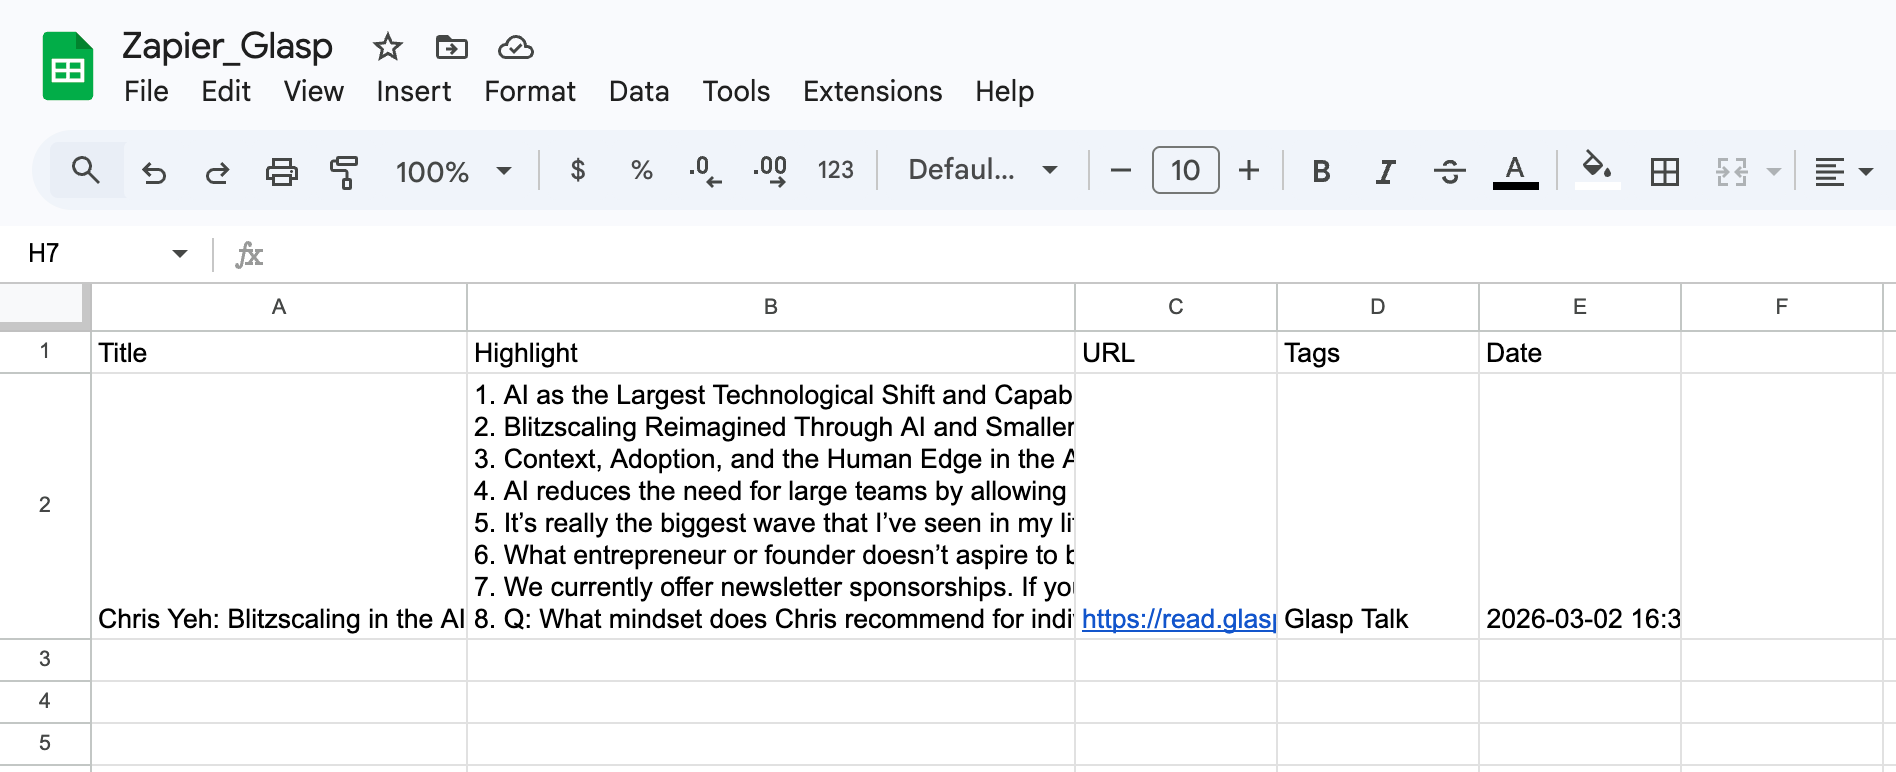
Example: Google Sheet
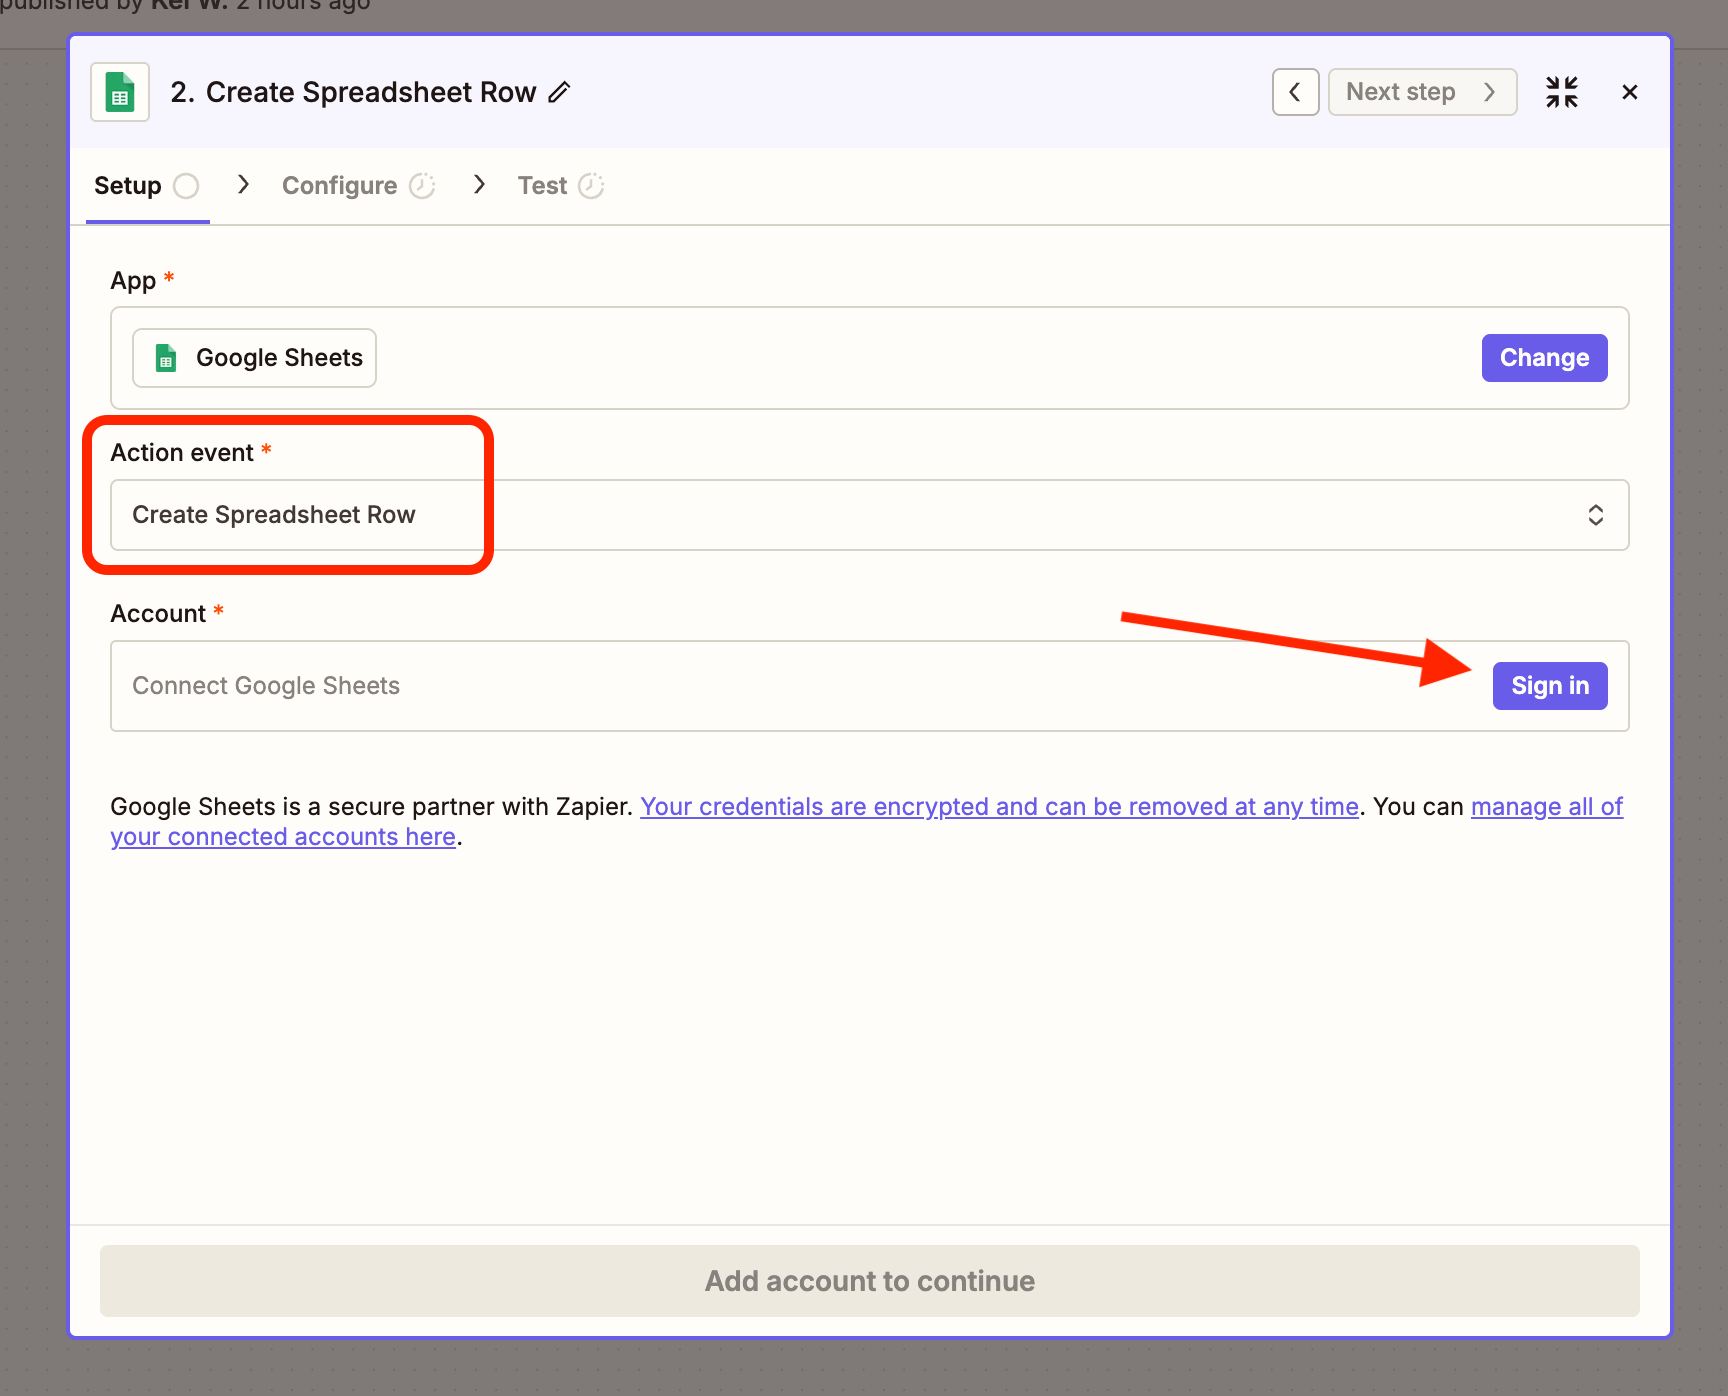
Select Google Sheets as the action app, then choose “Create Spreadsheet Row” as the action event. This adds a new row to your spreadsheet for each Glasp highlight. Click “Sign in” to connect your Google account.
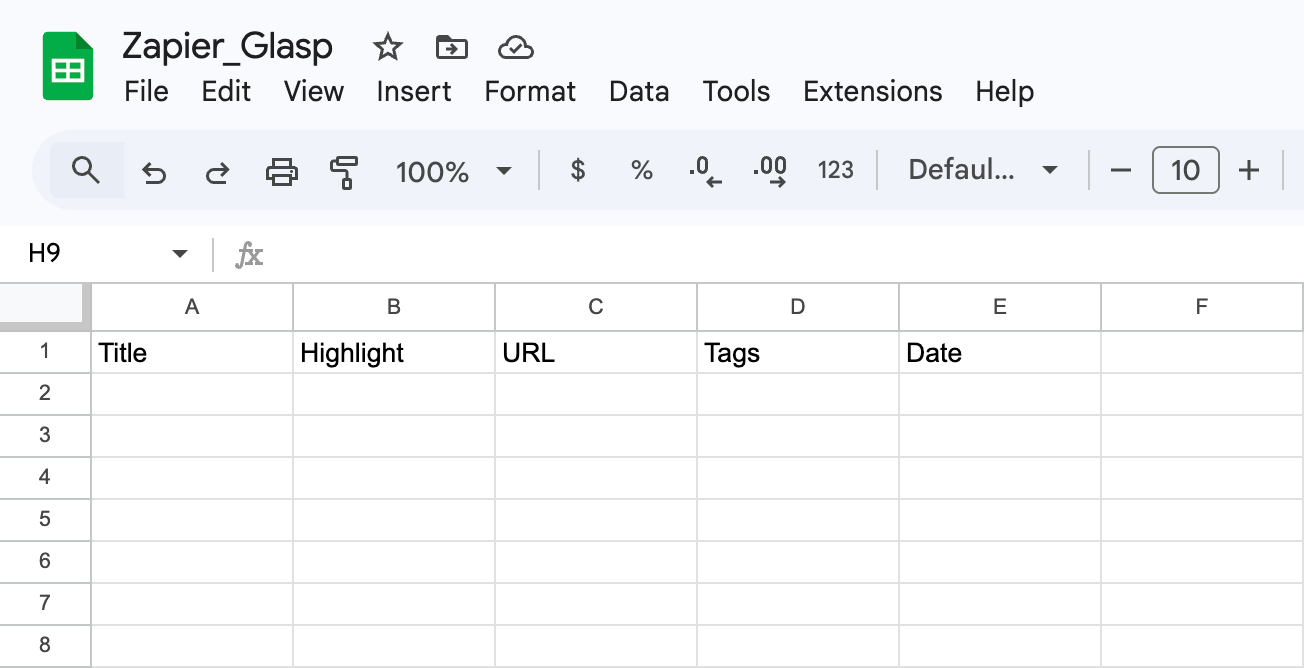
After signing in, select the spreadsheet and worksheet where you want highlights saved. Before configuring the action in Zapier, create a new Google Spreadsheet with column headers in the first row. Zapier will automatically detect these headers as fields. You can use any column names you like — here's an example:
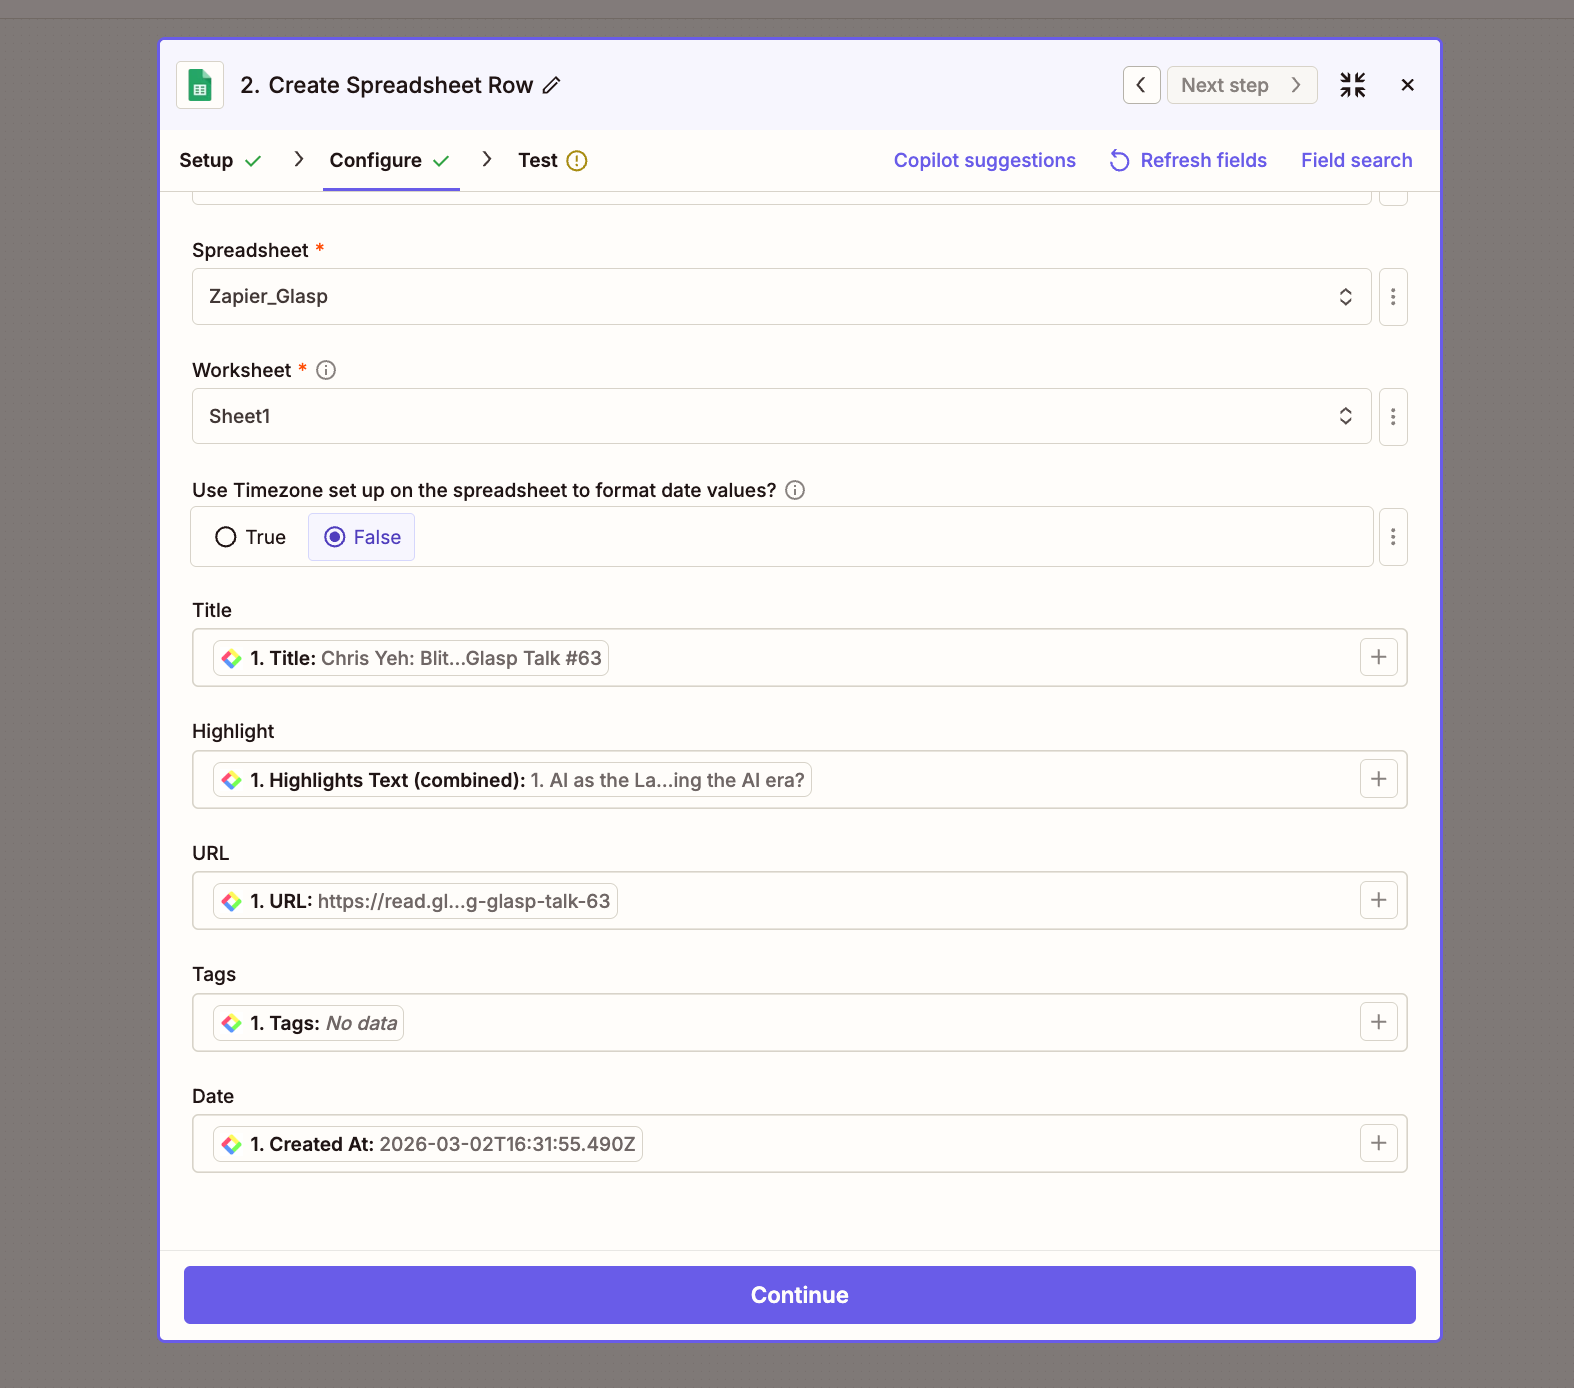
Then go back to Zapier and select your spreadsheet and worksheet. Zapier automatically detects the column headers as fields. Click the “+” button next to each field to map it to the corresponding Glasp data:
Title → Title
Highlight → Highlights Text (combined)
URL → URL
Tags → Tags
Date → Created At
Click "Continue" and then "Test step" to send a test row to your spreadsheet. If your test is successful, you can see the sheet populated with your Glasp highlight data like below:
Then proceed to Step 6 to publish your Zap.
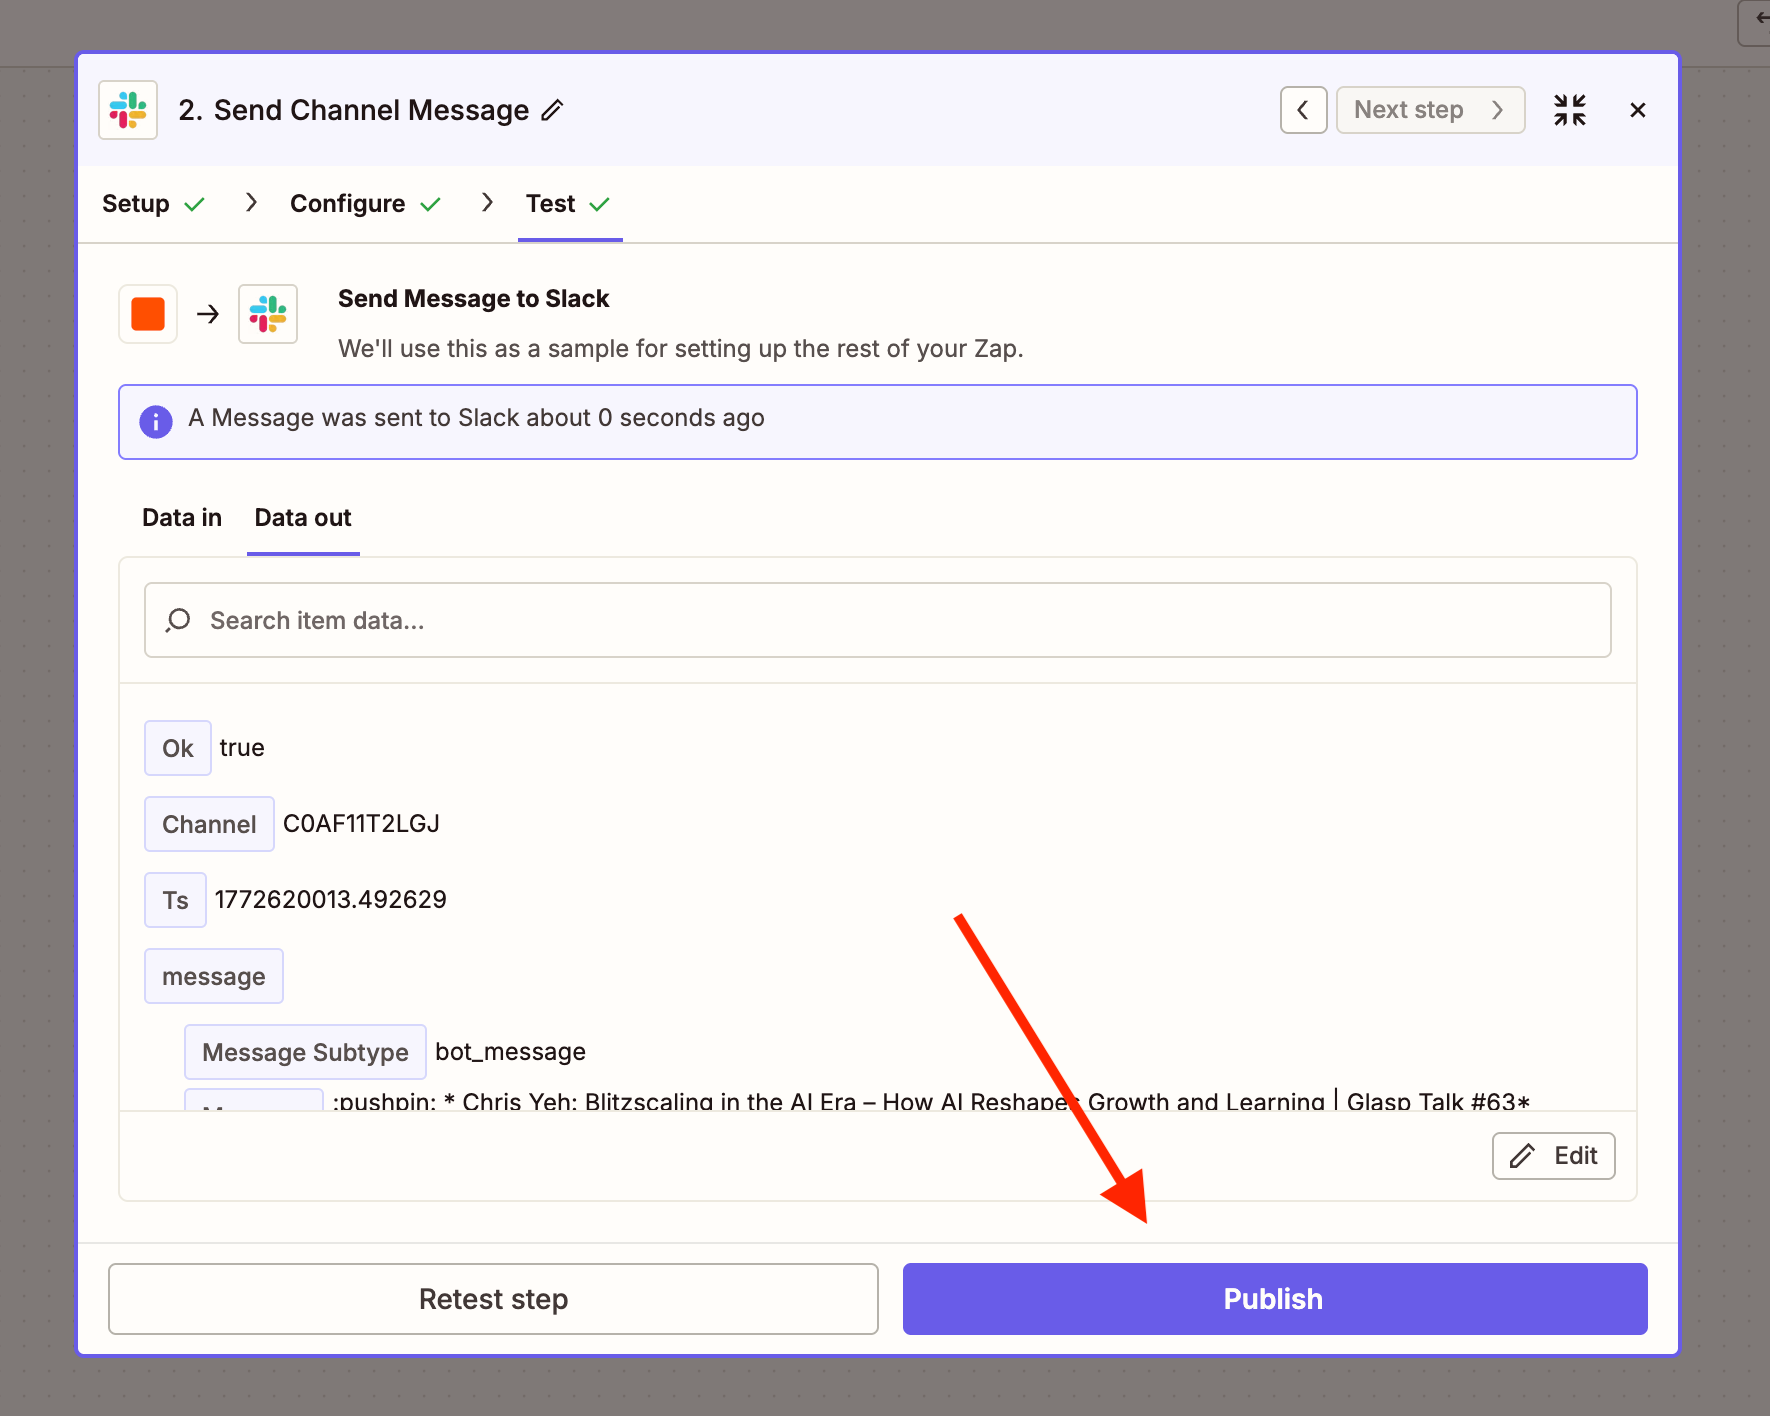
Example: Discord
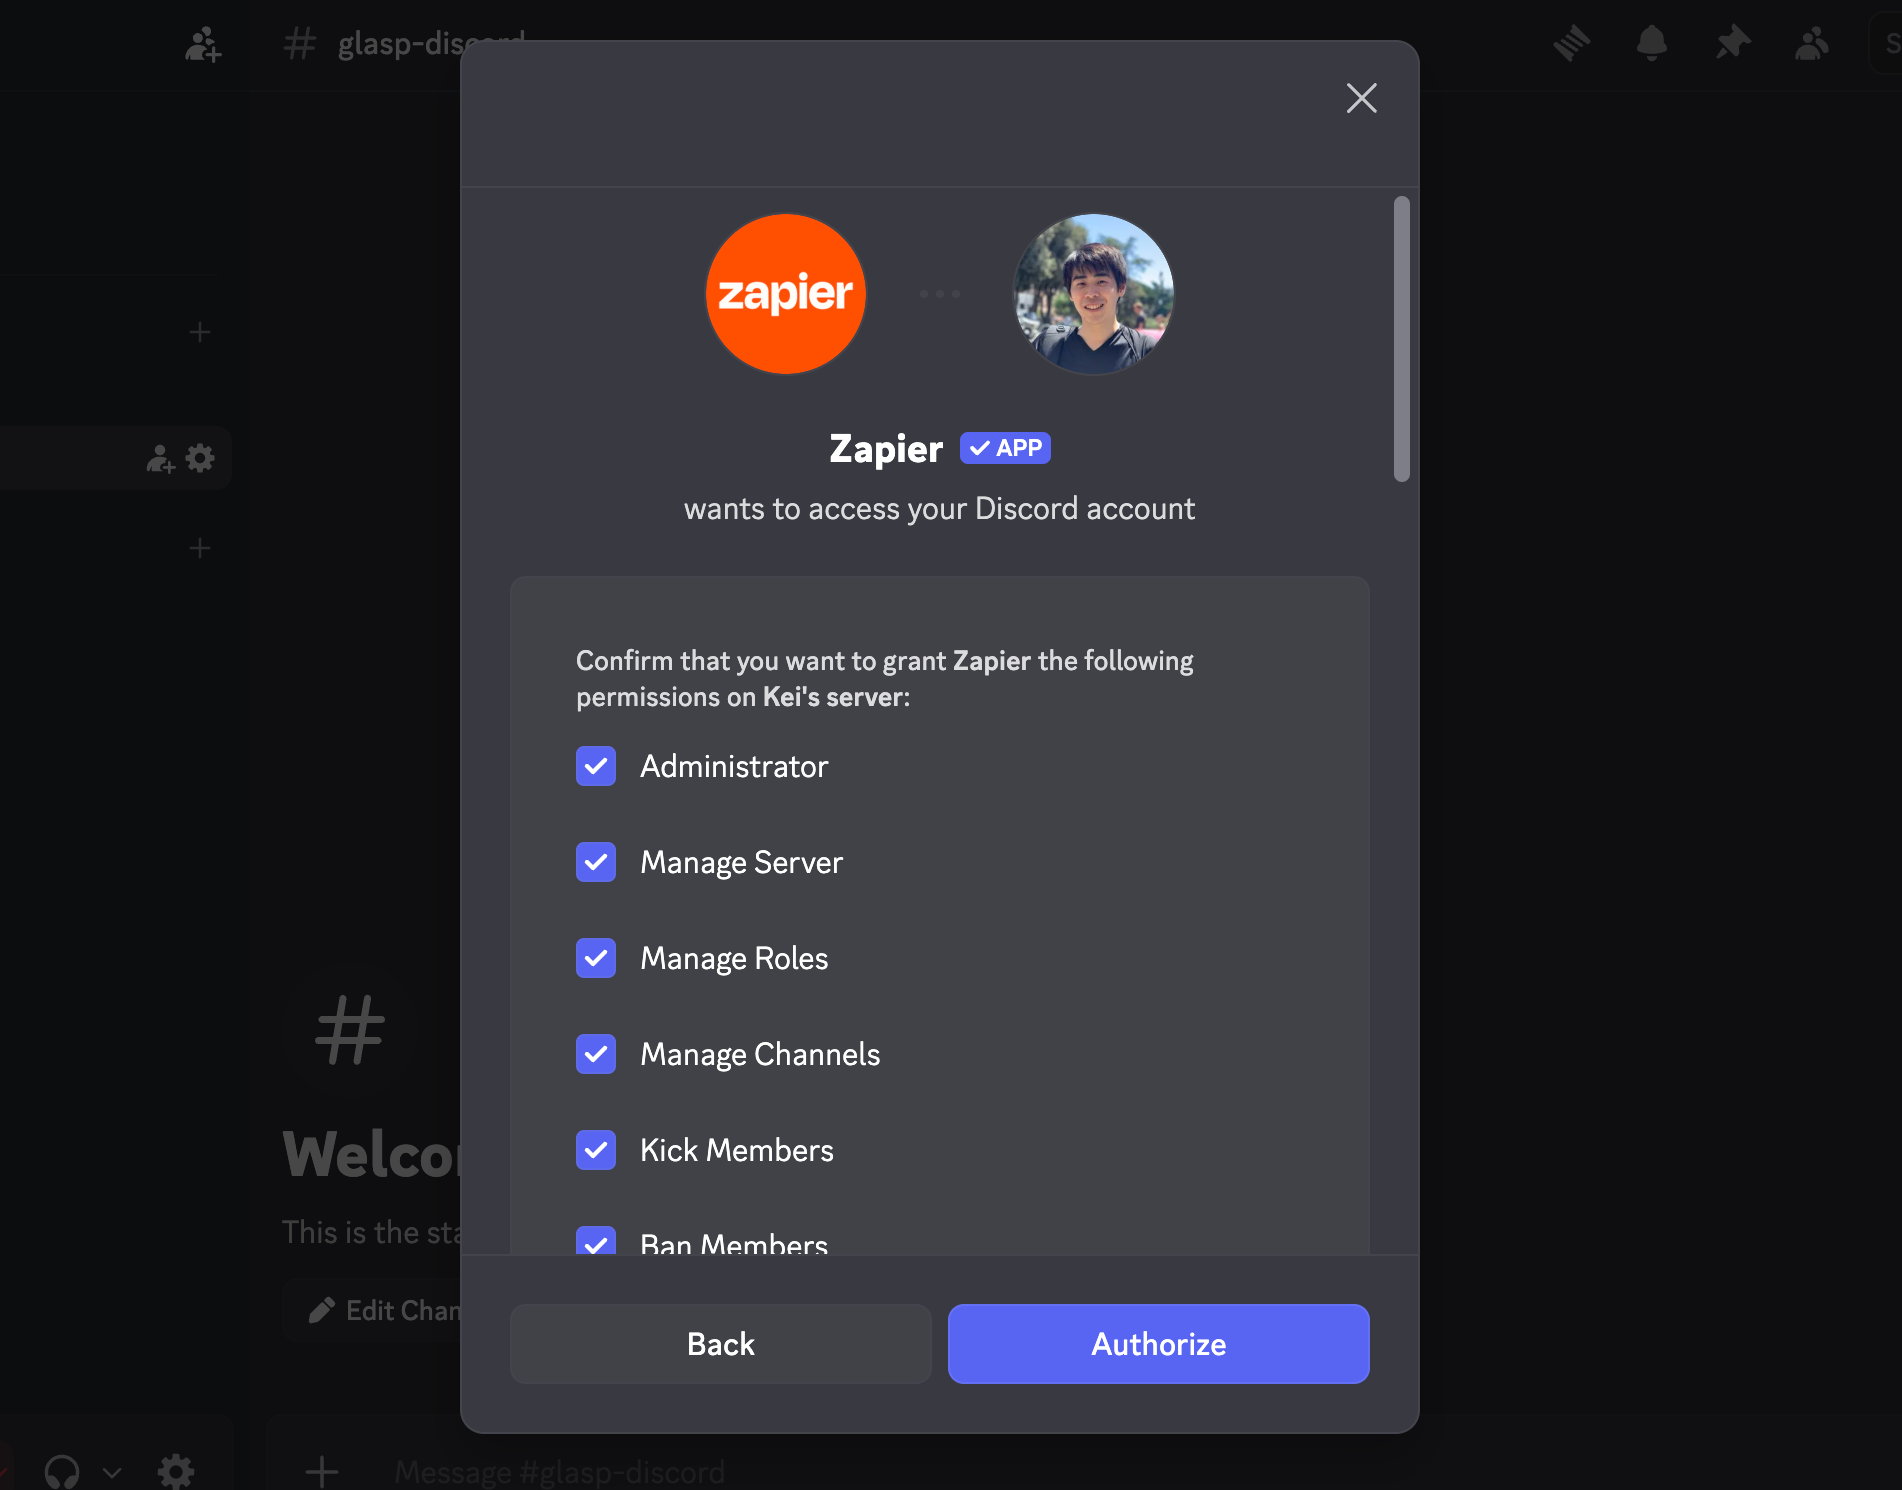
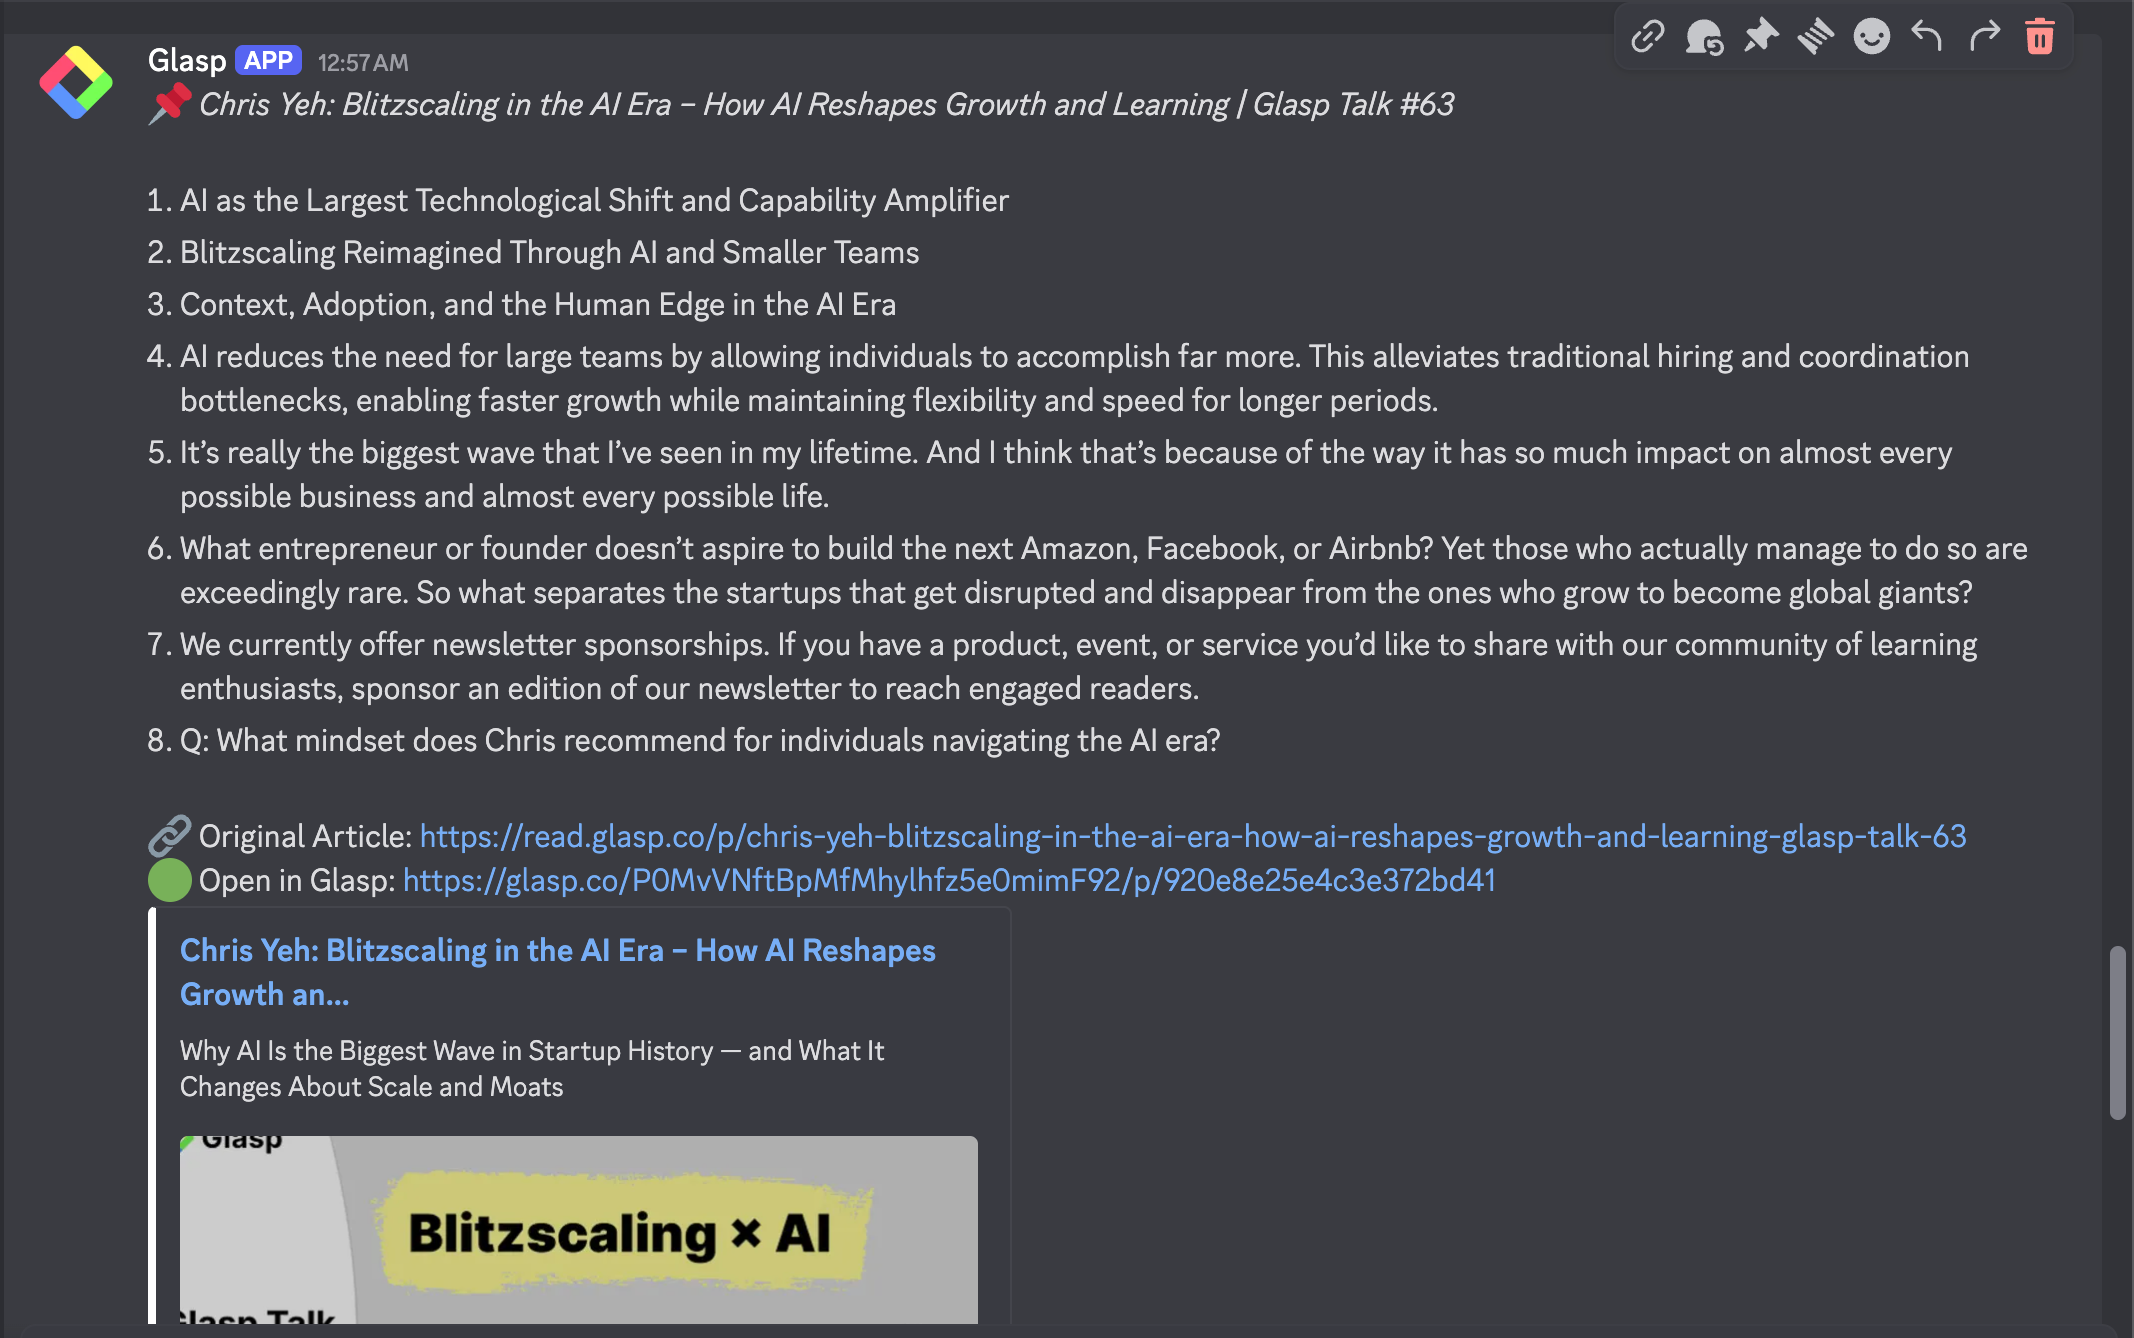
Select Discord as the action app, then choose “Send Channel Message” as the action event. Click “Sign in” to connect your Discord account.

A Discord authorization window will appear. Select your server, review the permissions, and click "Authorize" to grant Zapier access.
Once connected, configure the message:
Channel: Select the channel where you want highlights posted (e.g.,
glasp-discord)Message Text: Click the “+” button to map Glasp data fields. You can include the original article URL and Glasp URL for easy access to both the source and your highlights.
Bot Name: Set to “Glasp”
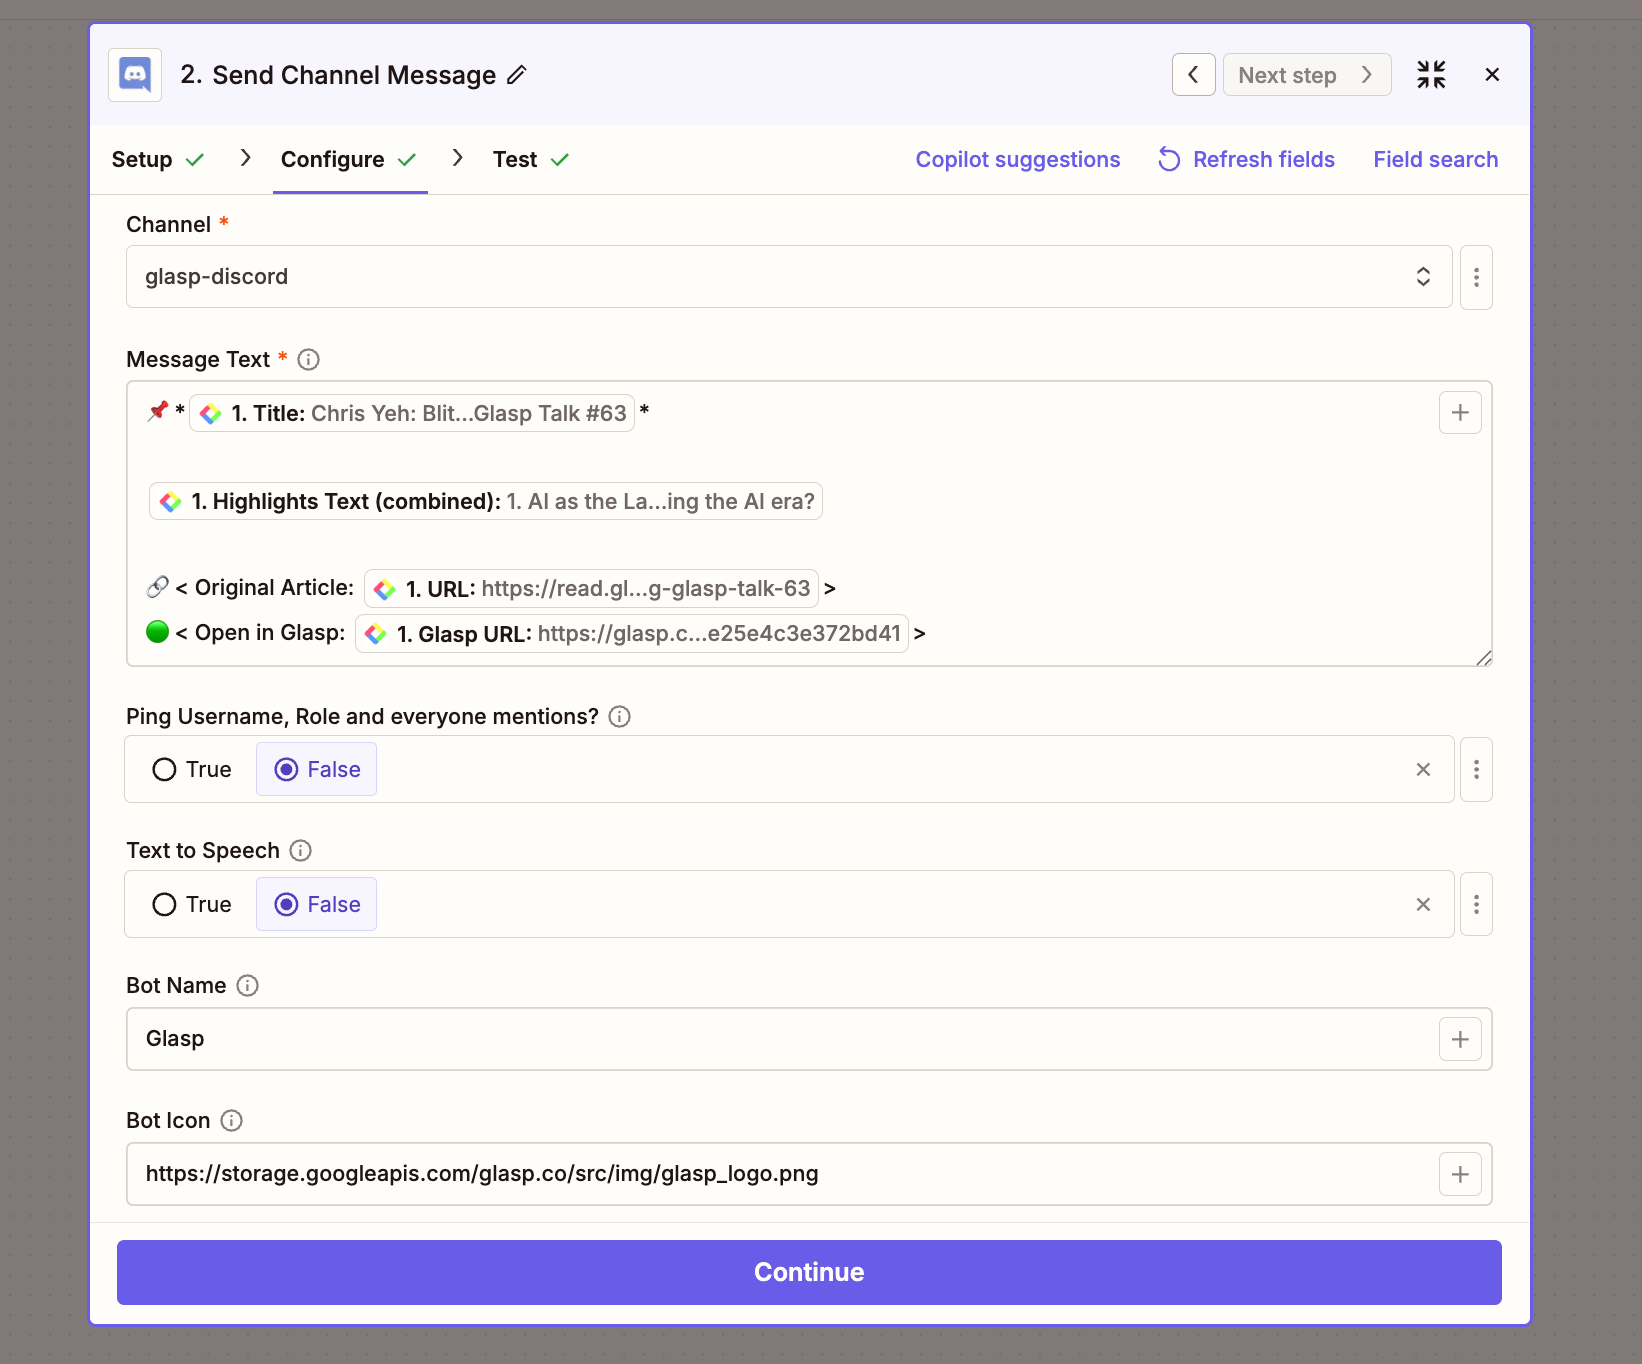
Click "Continue" and then "Test step" to send a test message to your Discord channel. Confirm it looks correct, then proceed to Step 6 to publish.
Example: Gmail
Select Gmail as the action app, then choose “Send Email” as the action event. Click “Sign in” to connect your Google account.

Once connected, configure the email. The key fields are:
To: Your own email address (or anyone you want to receive the highlights)
From Name: Set to “Glasp” so you can easily identify these emails in your inbox
Subject: Map to the page title from Glasp (e.g.,
New Highlight: {Title})Body Type: Select Plain for simple text, or HTML if you want formatted emails
Body: Click the “+” button to map Glasp data fields. For example:

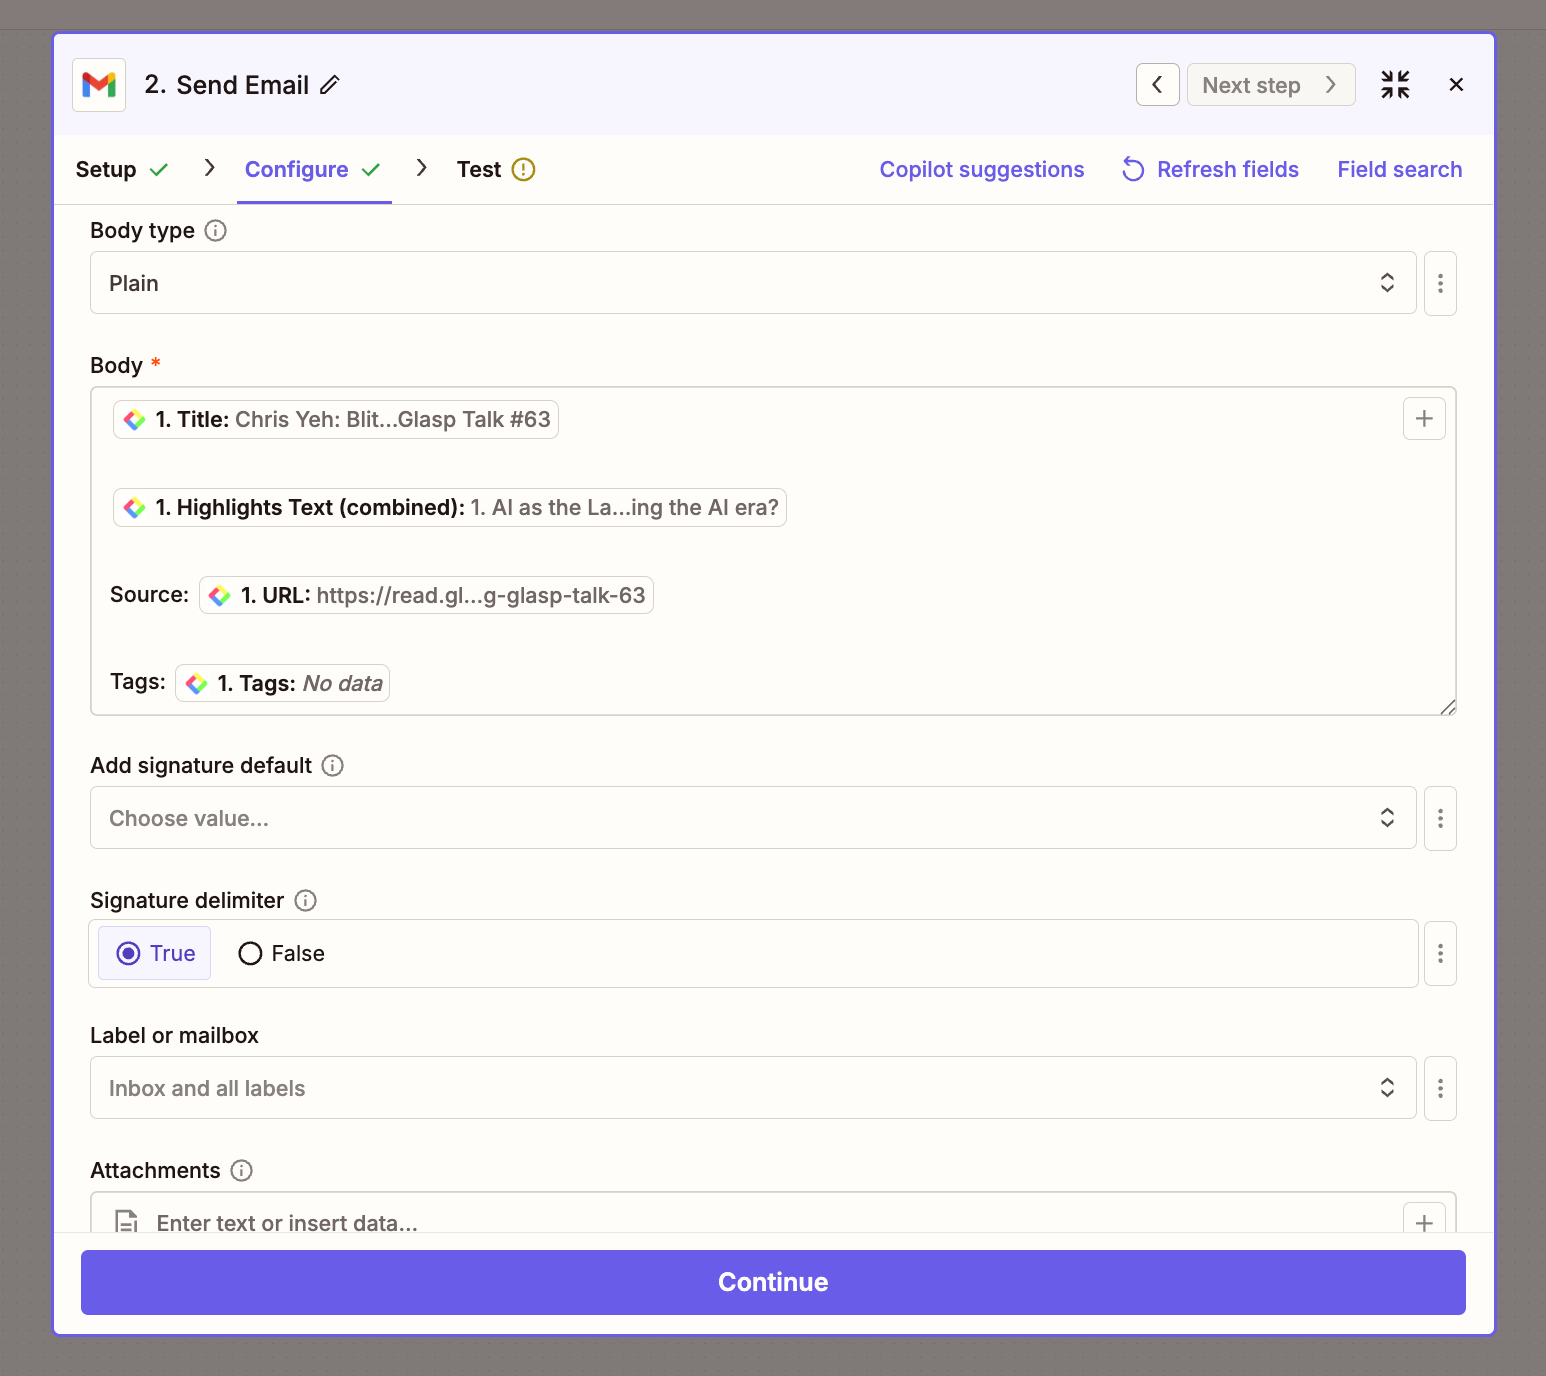
The other settings (Cc, Bcc, Attachments, Signature) can be left as default. Click “Continue” and then “Test step” to send a test email.
Tip: Set up a Gmail filter to automatically label these emails (e.g., “Glasp Highlights”) to keep them organized in your inbox.
Step 6: Publish the Workflow
If the test is successful, click “Publish” to activate your Zap. You’ll see a confirmation: “Your Zap is live!”
From now on, Zapier will automatically check for new Glasp highlights on a schedule (every 1 to 15 minutes, depending on your plan) and send them to your destination app. You can monitor your Zap’s activity and task history in the Zapier dashboard.
You’ll see a confirmation: “Success! Your Zap is live!” Your Zap will now run automatically every time a new highlight is saved in Glasp.

Zapier checks for new highlights on a schedule (every 1 to 15 minutes, depending on your plan). You can monitor your Zap's activity and task history in the Zapier dashboard.
Your highlights shouldn’t stay siloed in one tool.
With Glasp + Zapier, you can automatically route your reading insights to Slack, Google Sheets, Discord, Gmail, or any of Zapier’s 8,000+ integrations — turning passive highlighting into an active knowledge workflow.
If you haven’t already, sign up for Glasp and start building knowledge from everything you consume.
💡 Pro Tips
Go further with these resources:
👉 How to Auto-Export Glasp Highlights with n8n — Open-source alternative to Zapier
👉 How to Export Highlights & Notes to Notion — Manual export tutorial
👉 How to Export Highlights and Notes to Obsidian — Obsidian integration guide
Partner With Glasp
We currently offer newsletter sponsorships. If you have a product, event, or service you’d like to share with our community of learning enthusiasts, sponsor an edition of our newsletter to reach engaged readers.
What a great primer, for both Glasp and Zapier. Surely it will help someone with their research.